Use the right guide for the job
Surreal POS separates daily selling from management work. The bottom tabs cover the counter workflow, while the drawer menu opens stock, customers, staff, settings, backups, license, audit log, and FDMS tools.
Products, Cart, Orders, Reports
Cashiers sell from Products and Cart, then review completed sales from Orders. Reports help managers reconcile the day.
Management areas
Use the drawer for Stock, Customers, Staff & Shifts, Settings, License, Audit Log, Backup & Restore, and FDMS.
Role-based access
Cashiers focus on sales. Admins manage operational data. Shop Owners control settings, licensing, FDMS, and all user accounts.
First run and shifts
Create the owner account, sign in, switch users, and end shifts.
Make a sale
Find products, build a cart, take payment, and issue a receipt.
Orders and receipts
Review sales, reprint receipts, refund items, and void sales.
Products and stock
Add products, adjust stock, import CSV files, and run stocktake.
Customers
Create customer records and attach customer details to orders.
Reports and exports
Review performance and export PDF or CSV reports.
Settings and printers
Configure business details, tax, receipts, categories, and printers.
Staff and audit log
Manage users, roles, PINs, biometrics, shift history, and audit entries.
Backup and restore
Protect local data, encrypt backups, and restore from files.
Licensing and demo mode
Start a trial, use demo mode, activate, refresh, or deactivate a license.
FDMS compliance
Enable ZIMRA FDMS, register a fiscal device, and review configuration.
Important notes
Understand the actions that affect stock, sales, backups, and fiscal data.
Core workflows on an Android tablet
These screenshots show the common counter and management flows in the same tablet framing used throughout this documentation.
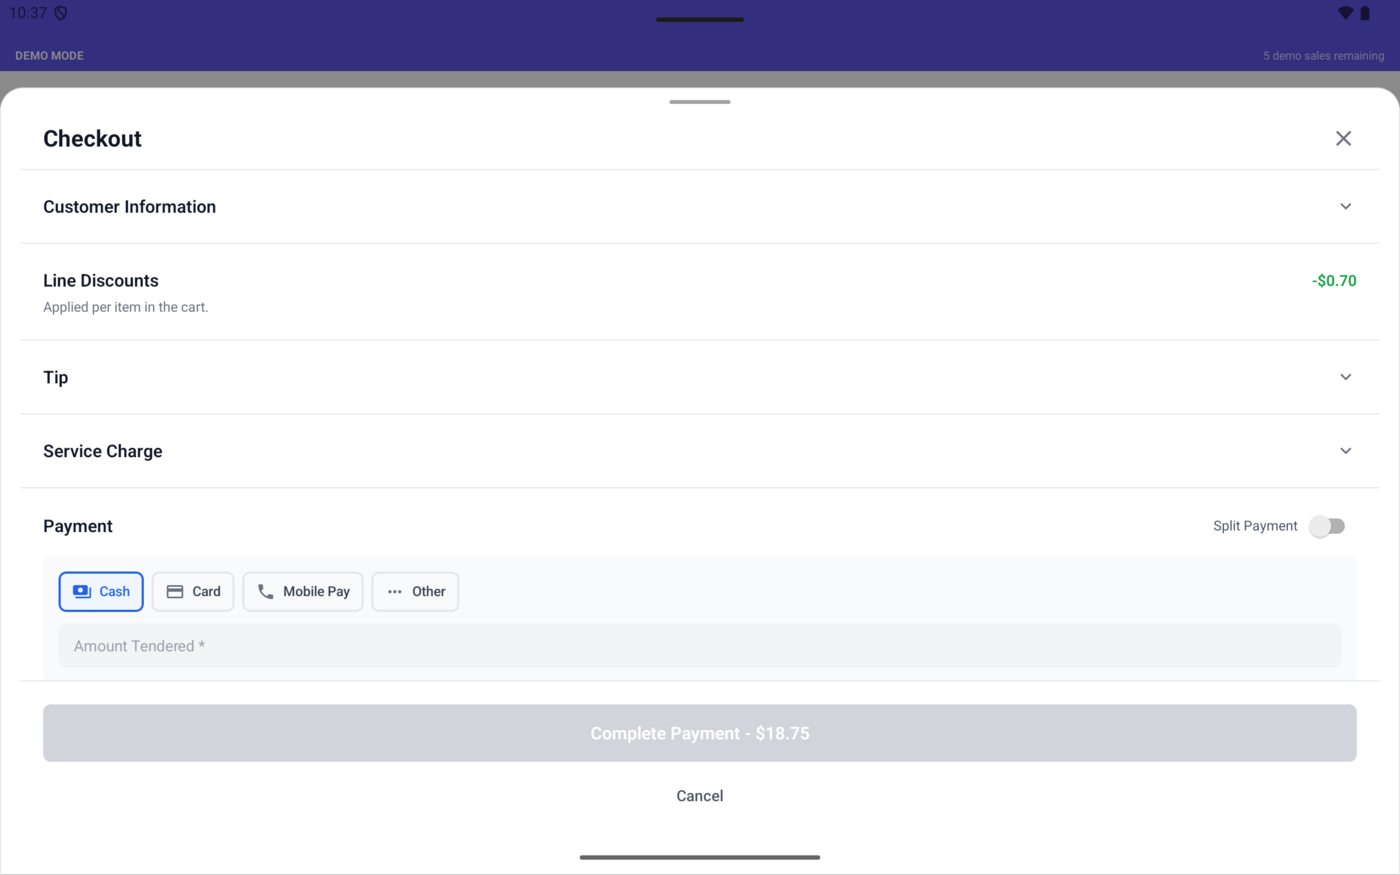
Checkout and payment
Choose a payment method, enter cash tendered, check change due, and complete payment.
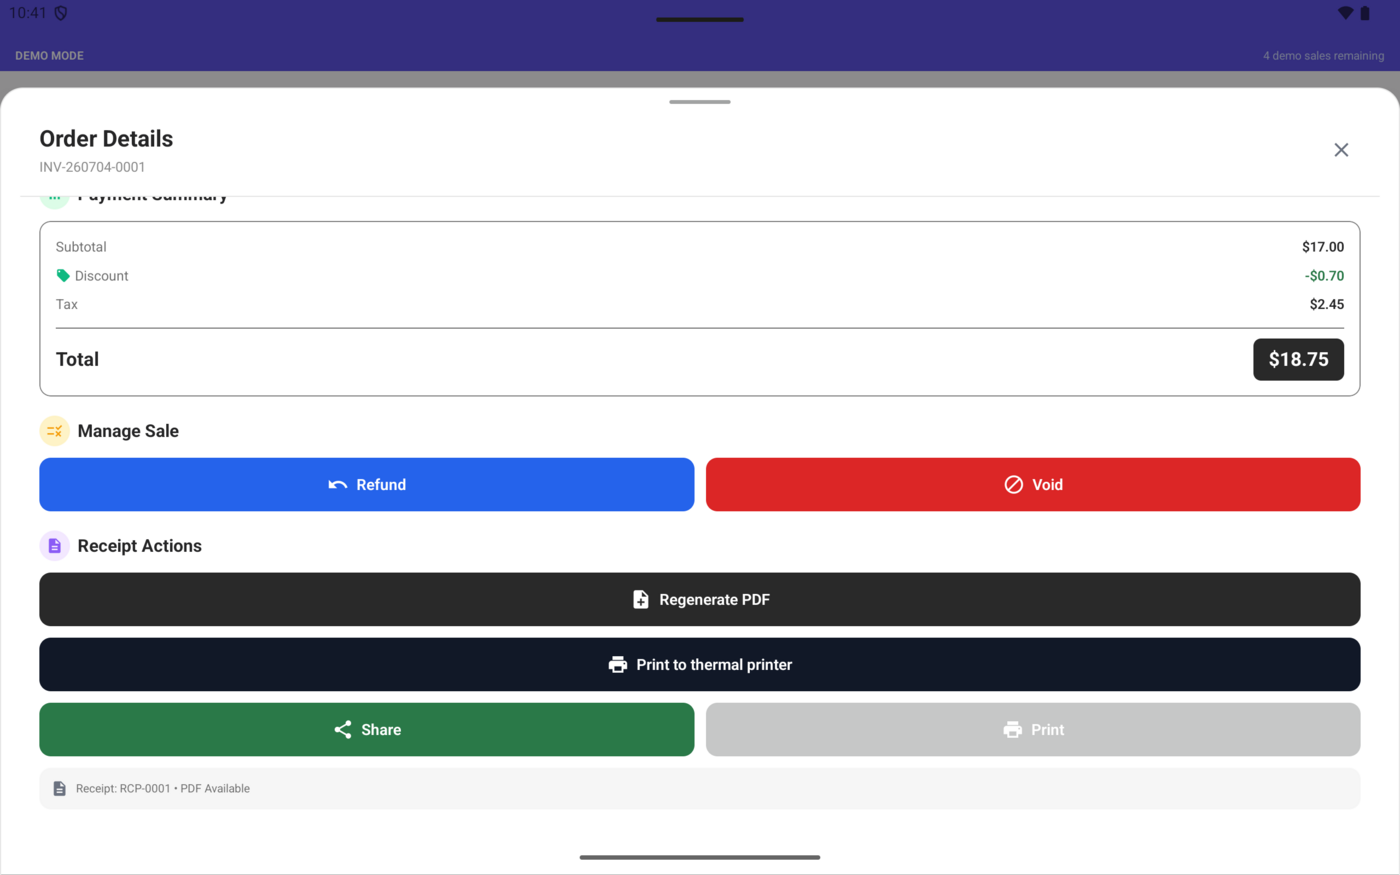
Order actions
Review totals, refund or void with approval, and regenerate or print receipts.
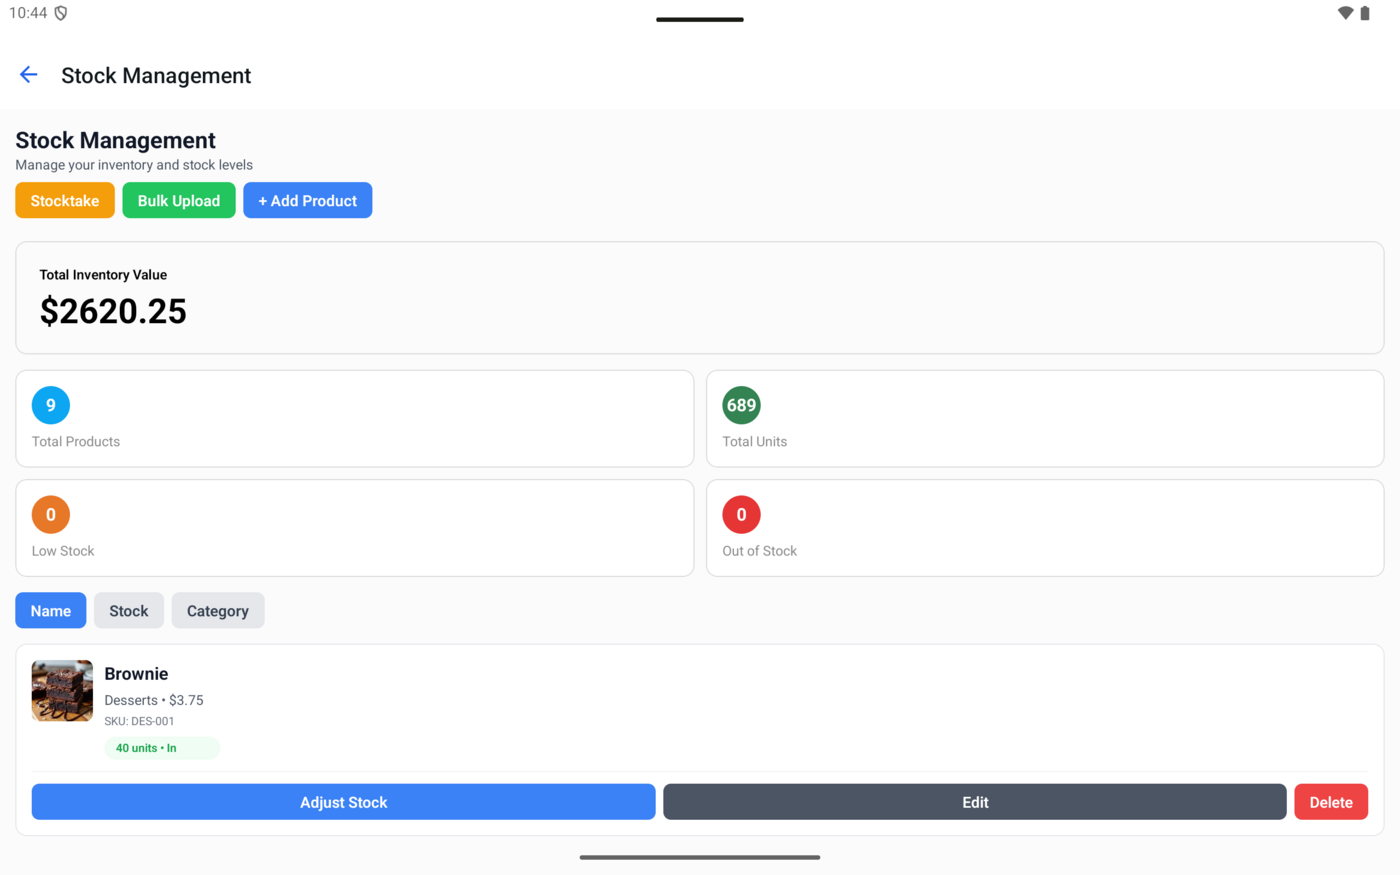
Stock management
Add products, bulk upload, run stocktake, and adjust stock from one screen.
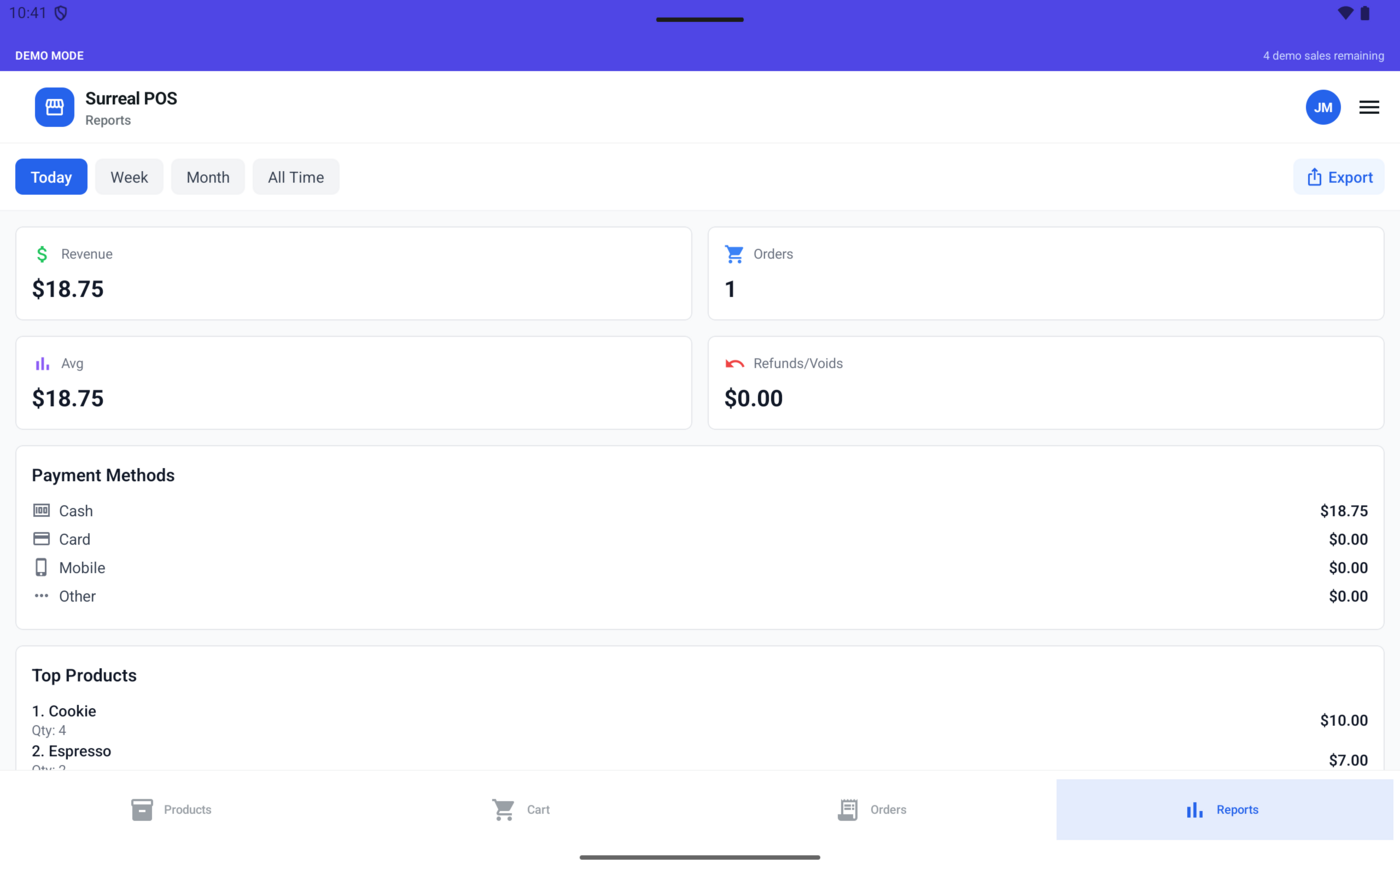
Reports and exports
Switch periods, reconcile payment methods, review top products, and export files.
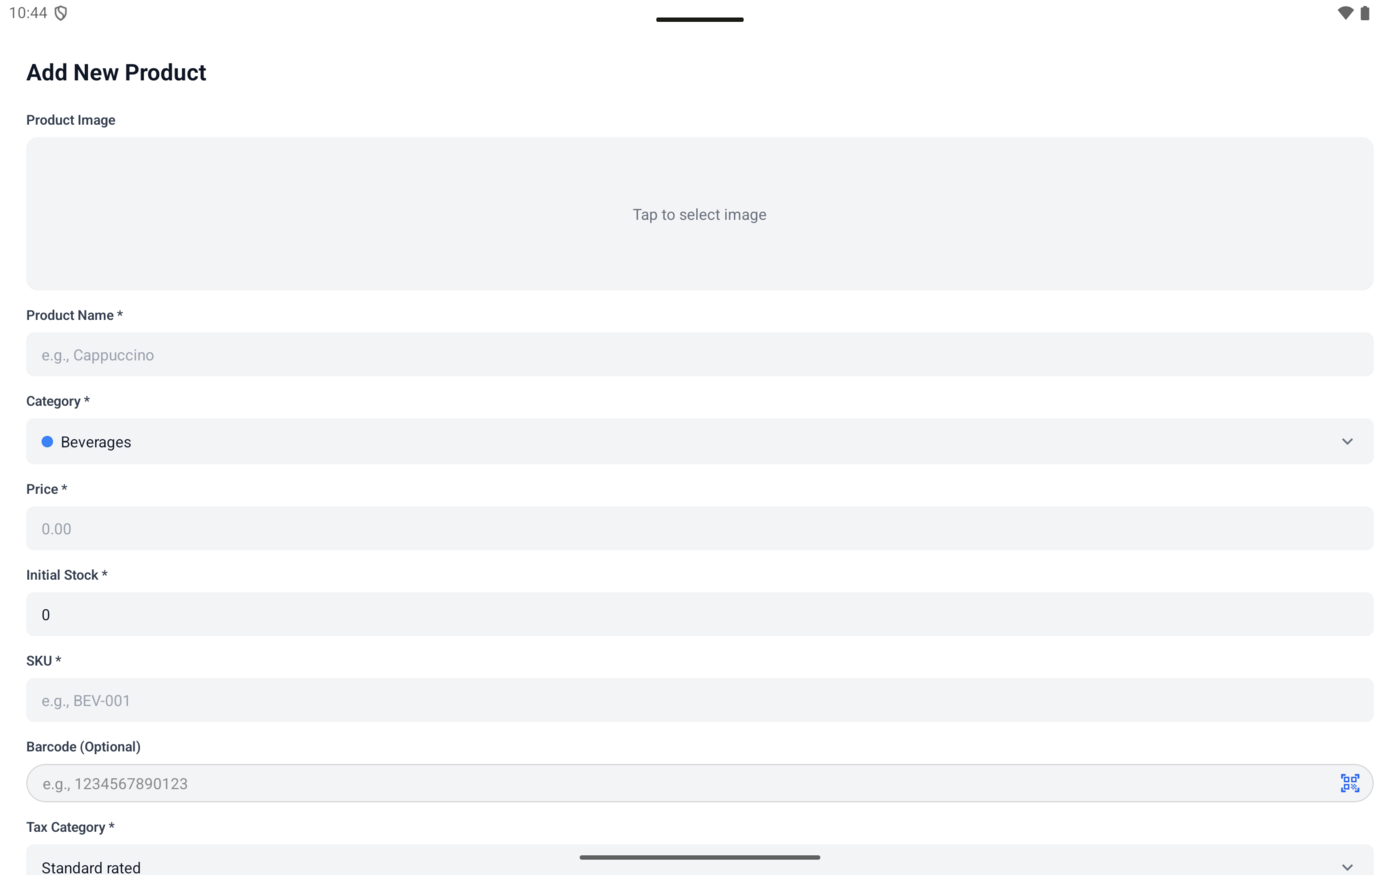
Product setup
Capture price, stock, SKU, barcode, tax category, and image when adding a product.
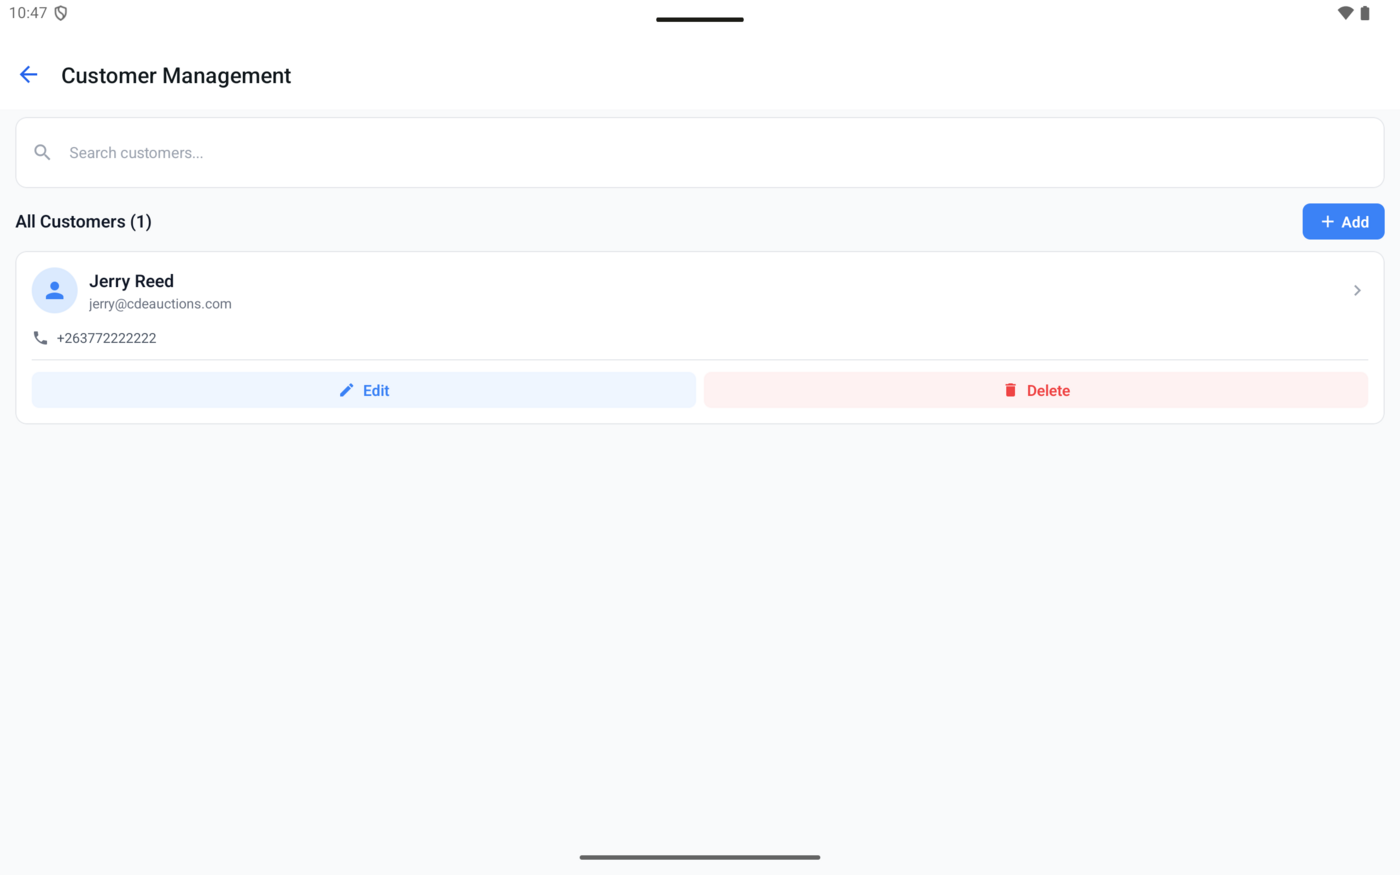
Customers
Keep contact and B2B details, then attach a customer to receipts and invoices.
Create the first account and manage cashier shifts
Use this guide when setting up the app for the first time, starting a staff shift, switching users, enabling biometric unlock, or ending a shift.
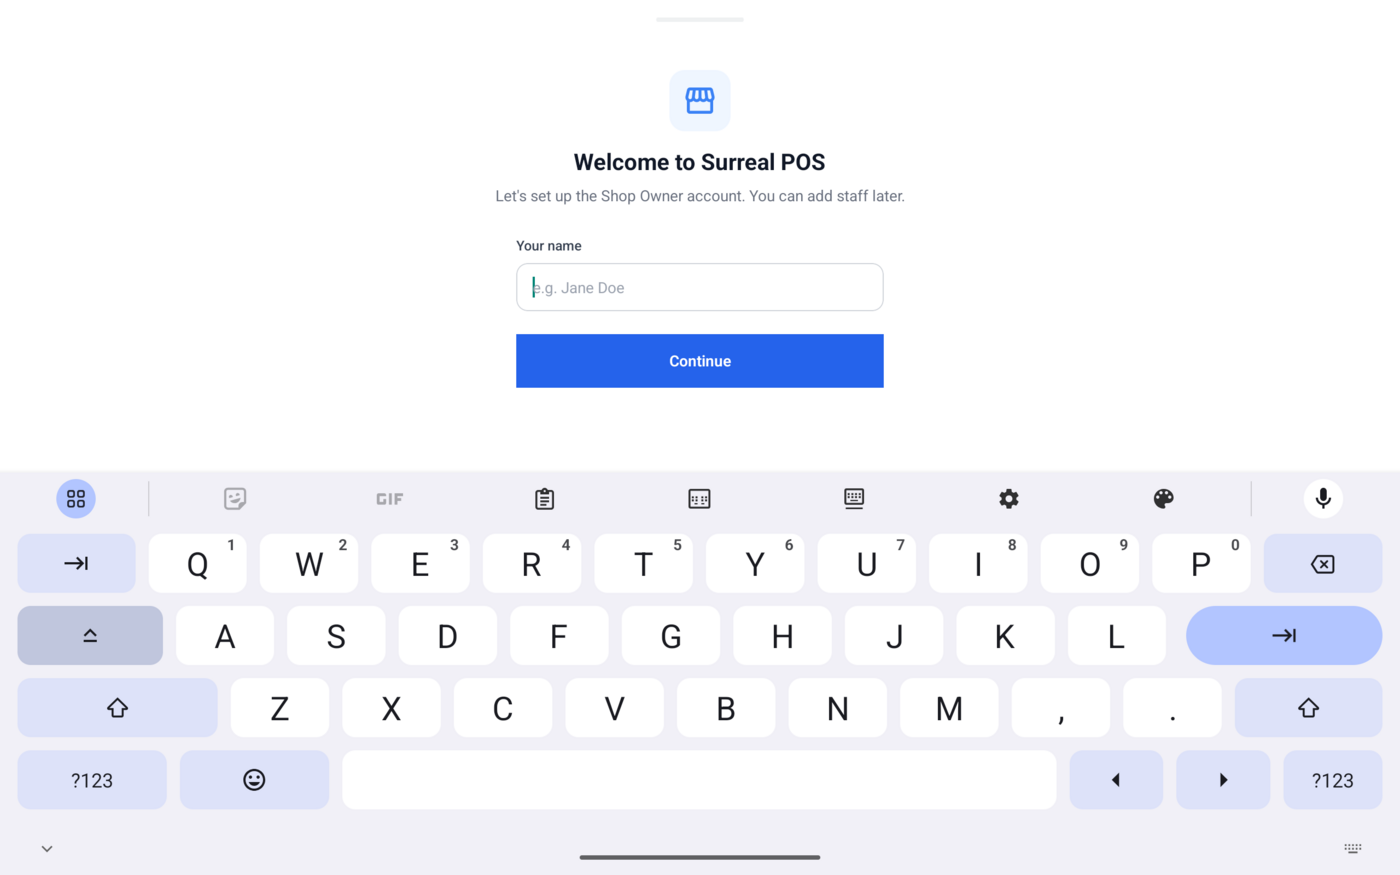
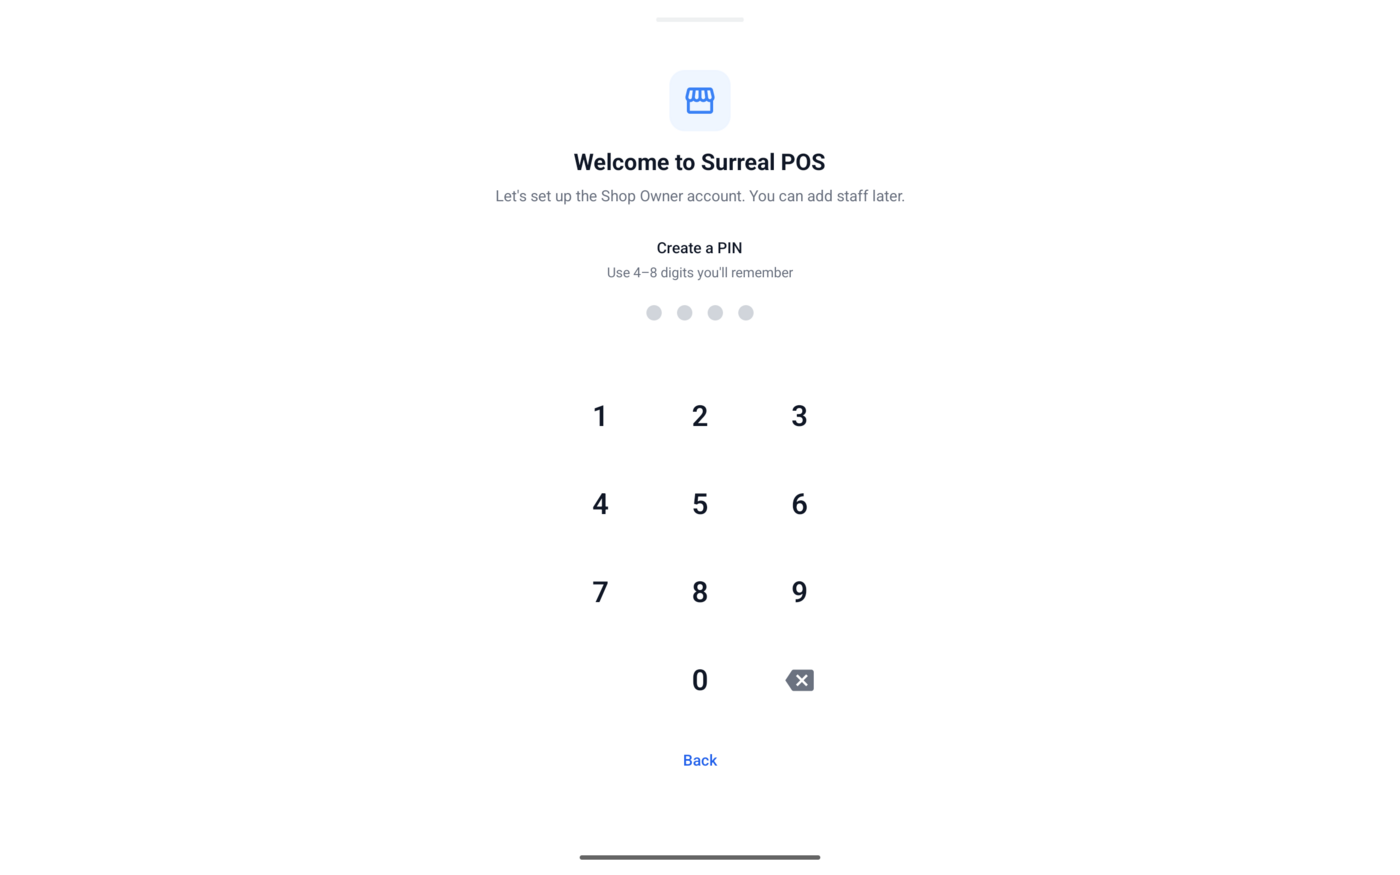
Create the first Shop Owner
- Open Surreal POS on a device with no staff accounts.
- On Welcome to Surreal POS, enter the owner name.
- Tap Continue.
- Create a numeric PIN with 4 to 8 digits.
- Confirm the same PIN.
The app creates the first Shop Owner account. This owner can add admins and cashiers later from Staff & Shifts.
Start or switch a shift
- On Who's working?, choose the staff account.
- Enter the user's PIN.
- Tap Start shift.
- To switch users, open the drawer and tap Switch user.
- Choose the next account and sign in with that user's PIN.
End a shift
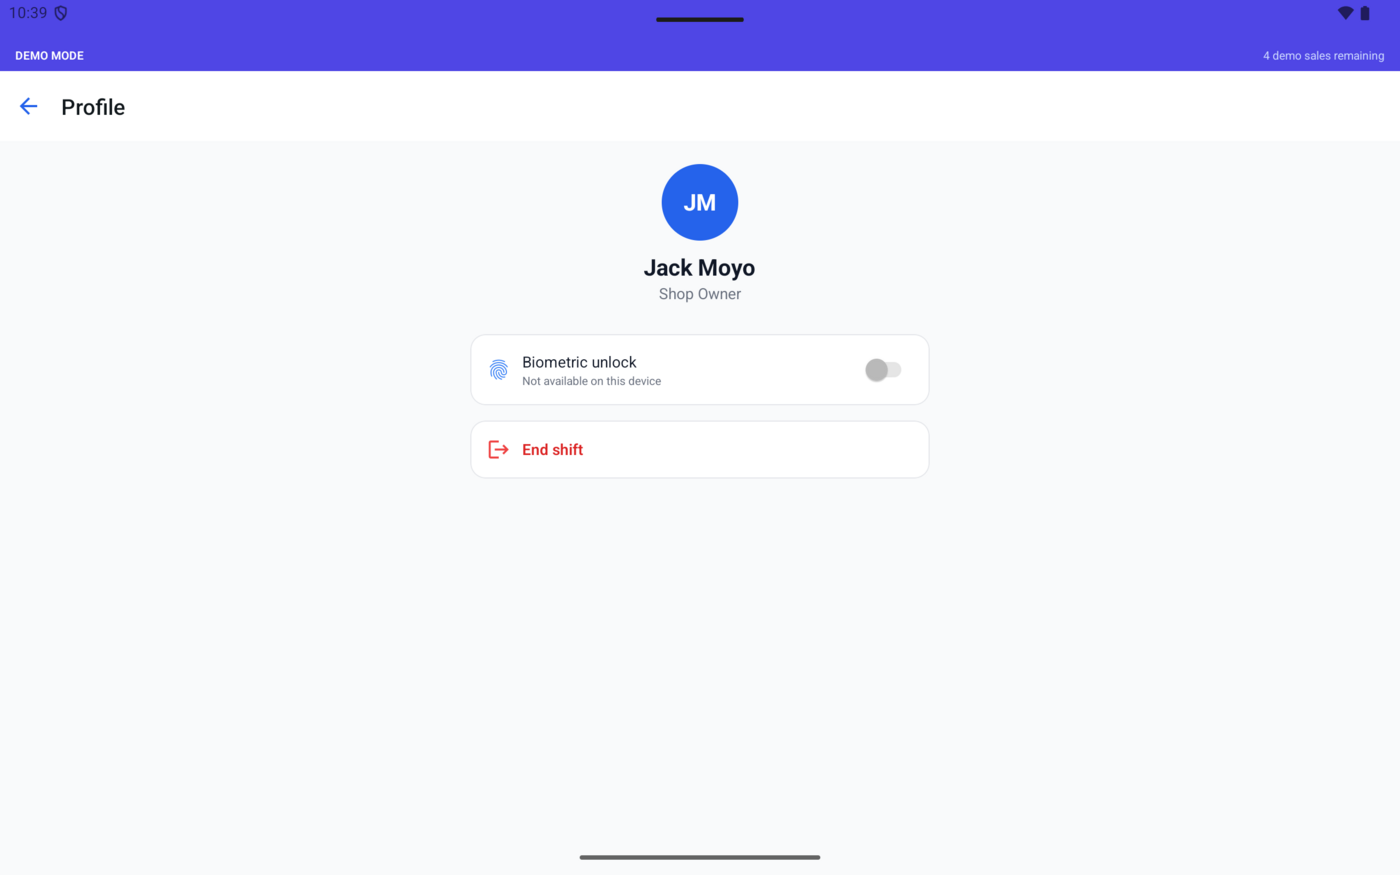
End a shift from the drawer menu or from My Profile. Ending a shift returns the app to the user picker and keeps shift totals available in Reports and Staff & Shifts.
Enable biometric unlock
- Open the drawer menu.
- Tap My Profile.
- Turn on Biometric unlock.
- Confirm with the device biometric prompt.
- If no active staff accounts exist, ask the Shop Owner to add one.
- If a PIN does not work, an admin or owner can reset it.
- If biometrics are unavailable, set them up in device settings first.
Find products, build a cart, and take payment
This is the standard cashier flow for searching products, scanning barcodes, reviewing the cart, taking payment, and creating a receipt or invoice.
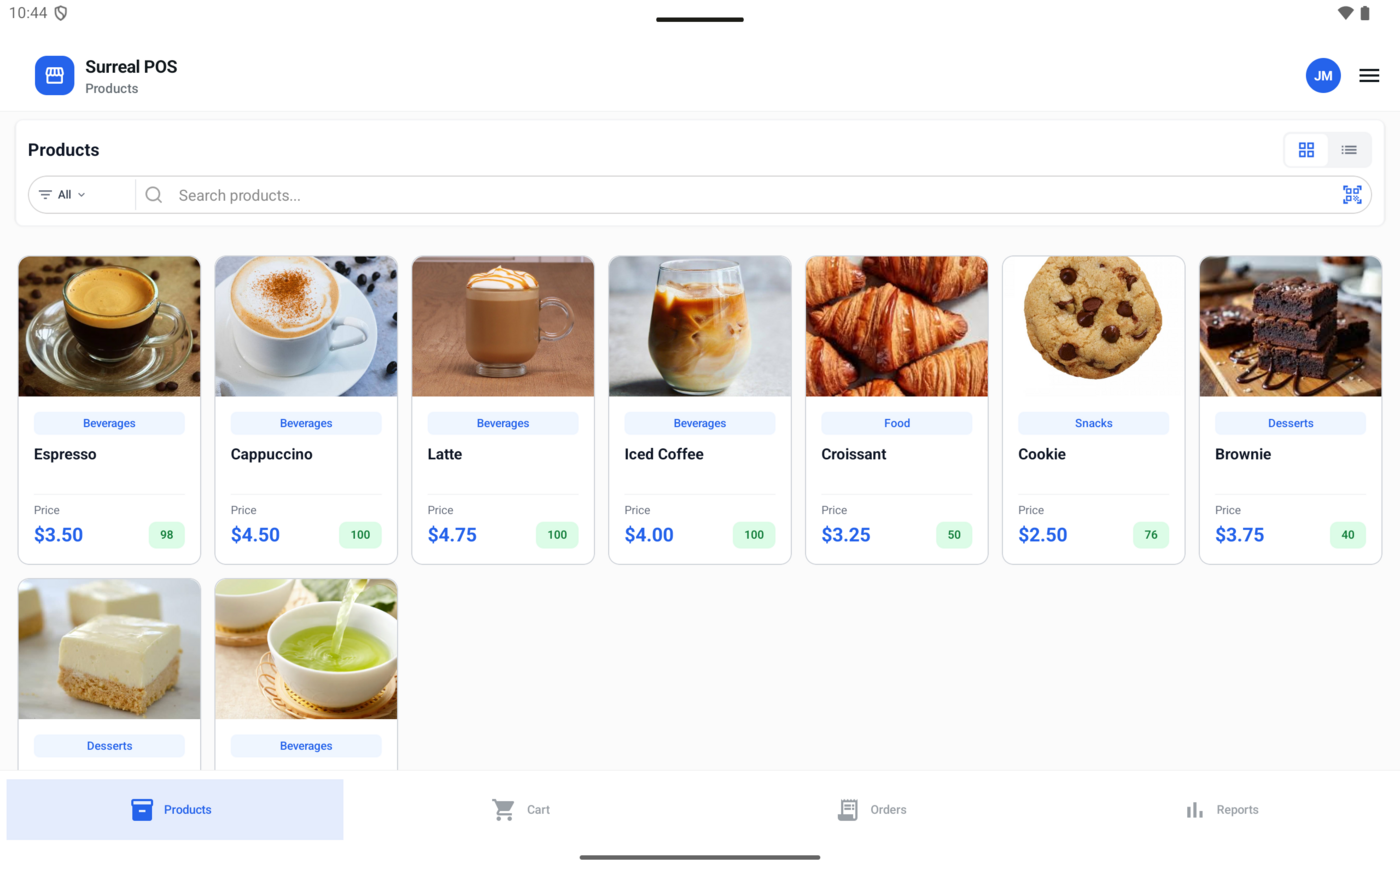
Find products
- Open the Products tab.
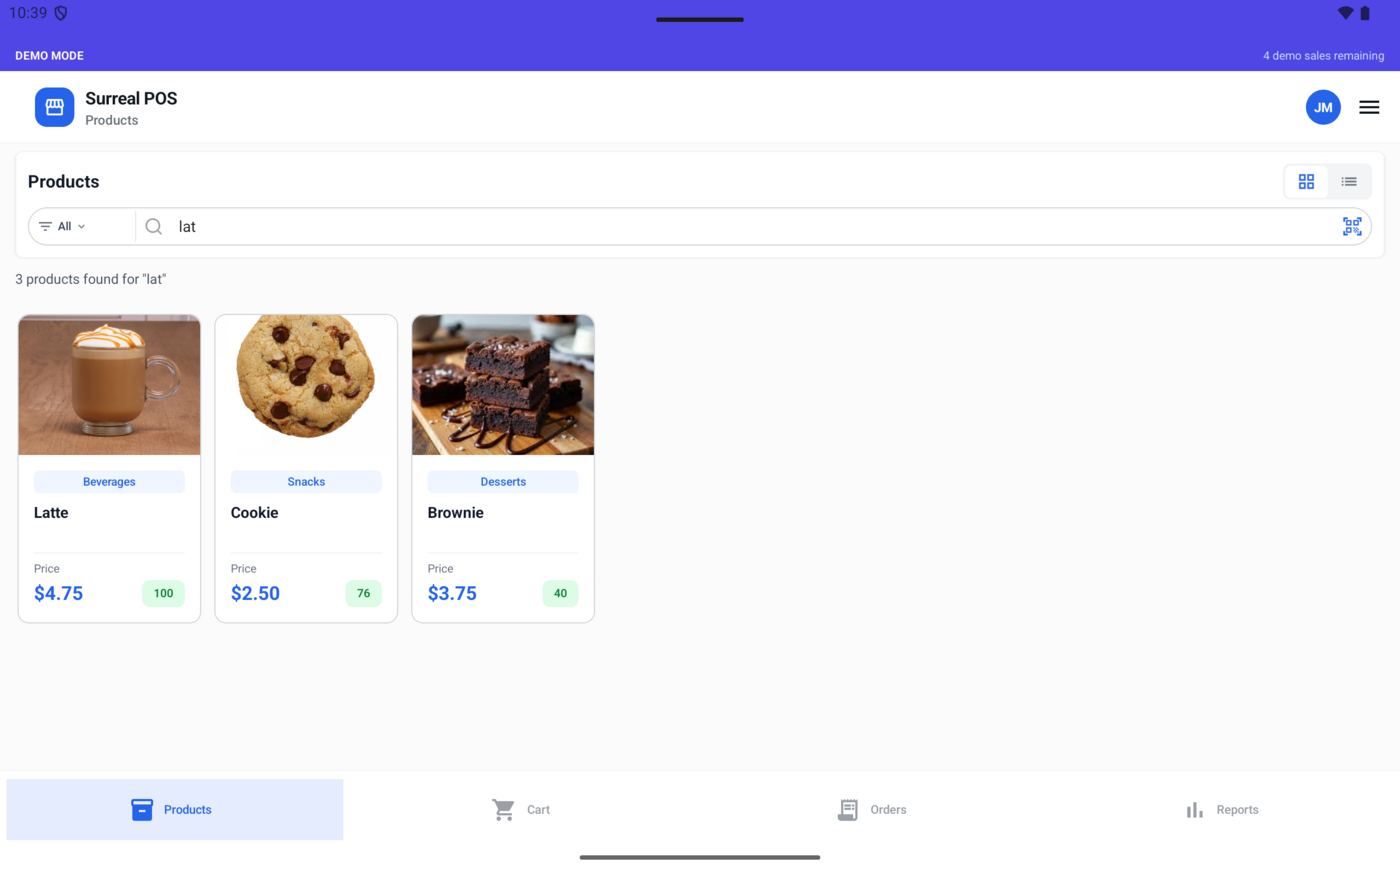
- Search by product name, description, or category.
- Use category filters to narrow the product list.
- Switch between grid and list view when useful.
- Tap the barcode scanner button to scan a code into search.
If there are no products, the app may offer sample data. For a real store, add products from Stock instead.
Add items to the cart
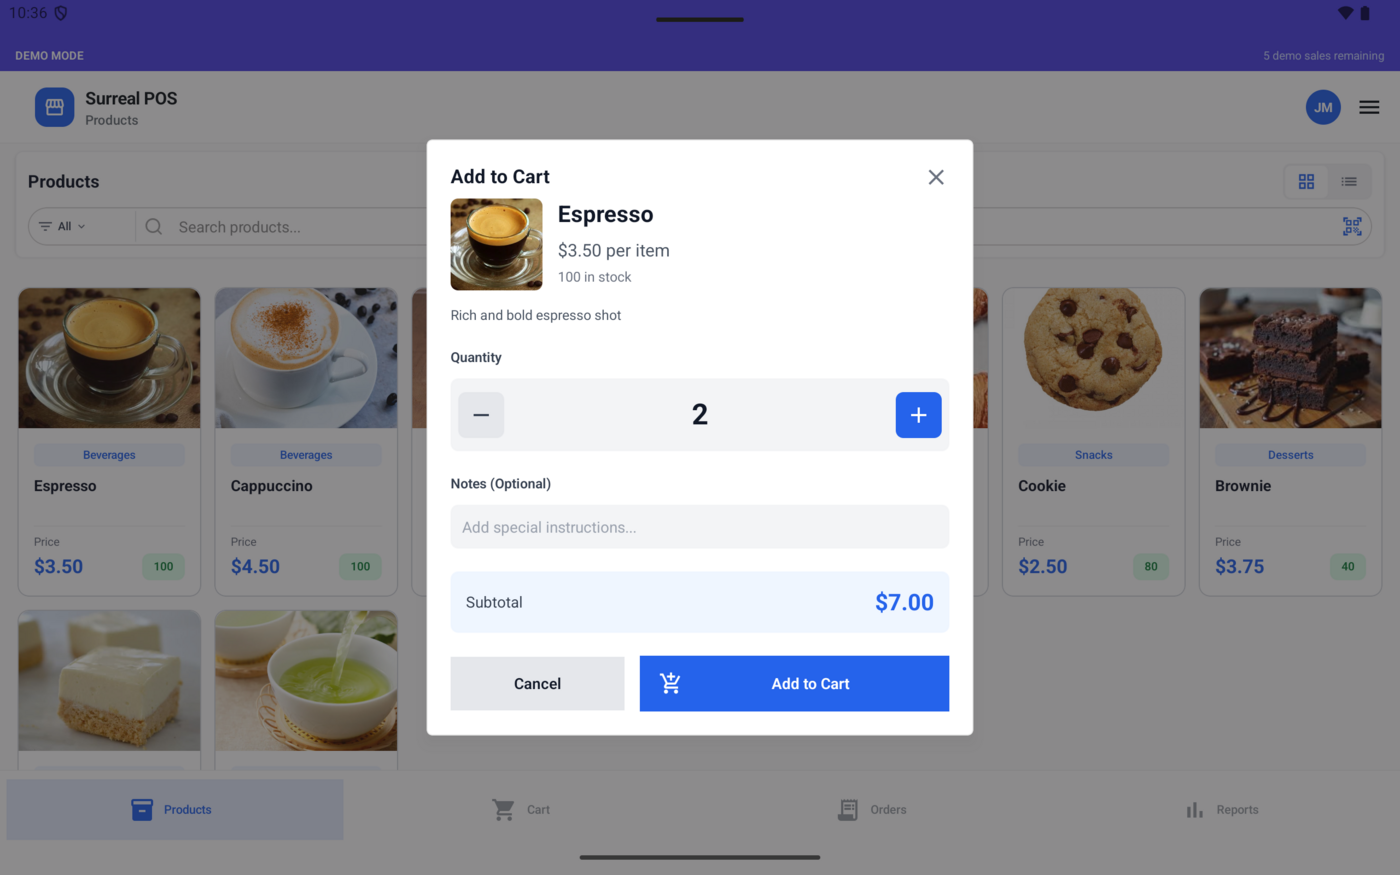
- Tap a product.
- Choose the quantity.
- Add notes if the item needs them.
- Tap the add button.
The cart uses current tax settings and each product's tax category when calculating the line.
Review the cart
- Open the Cart tab.
- Use plus or minus to change quantity.
- Tap delete to remove a line.
- Tap Add discount or Edit discount for a line item.
- Review subtotal, tax, discount, and total.
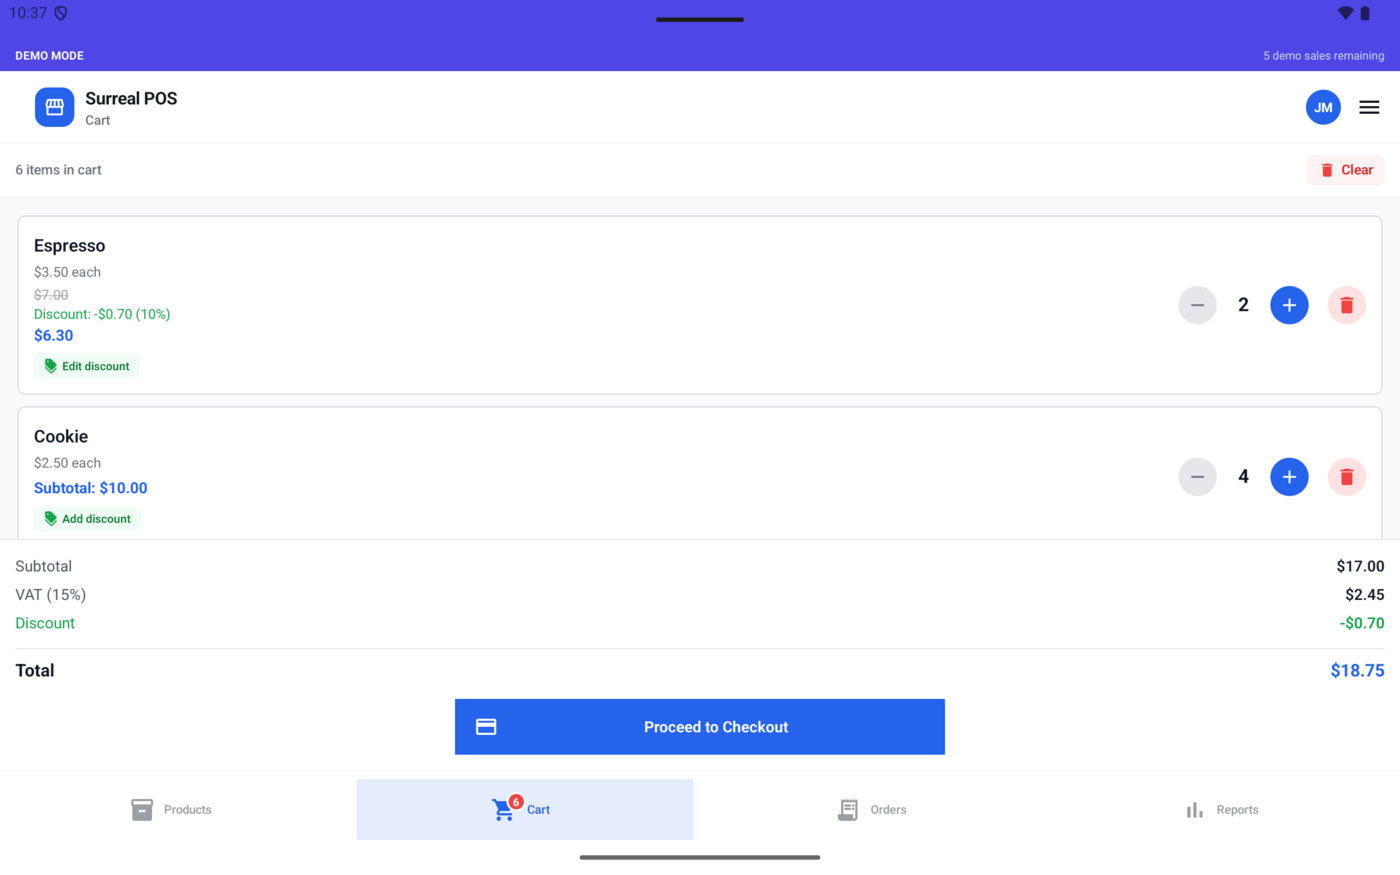
Checkout
- Tap Proceed to Checkout.
- Optionally expand Customer Information and choose a customer.
- Optionally add a tip or service charge.
- Choose Cash, Card, Mobile Pay, or Other.
- Choose Receipt or Invoice.
- Turn Share After Checkout on or off.
- Tap Complete Payment.
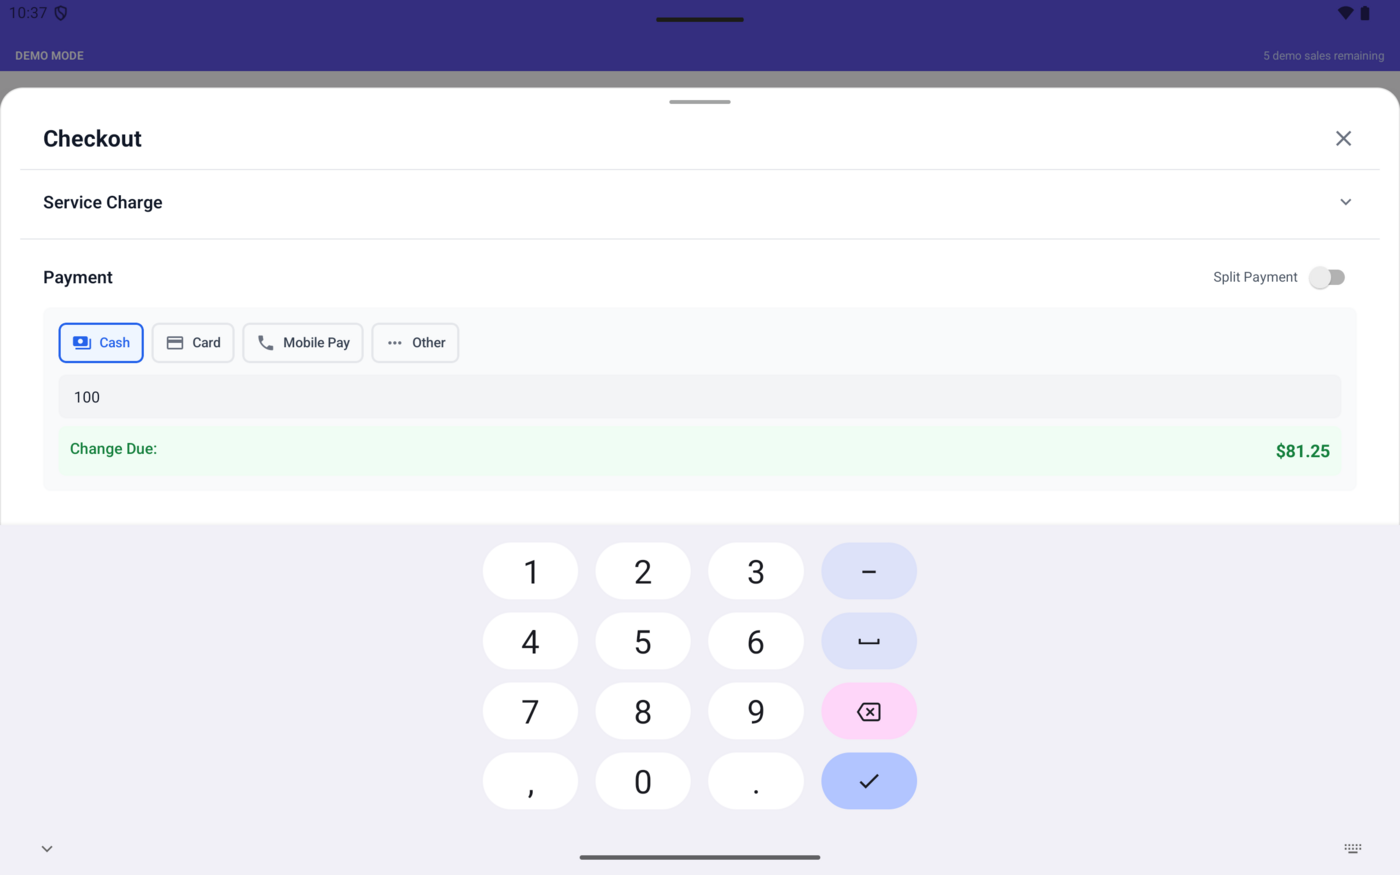
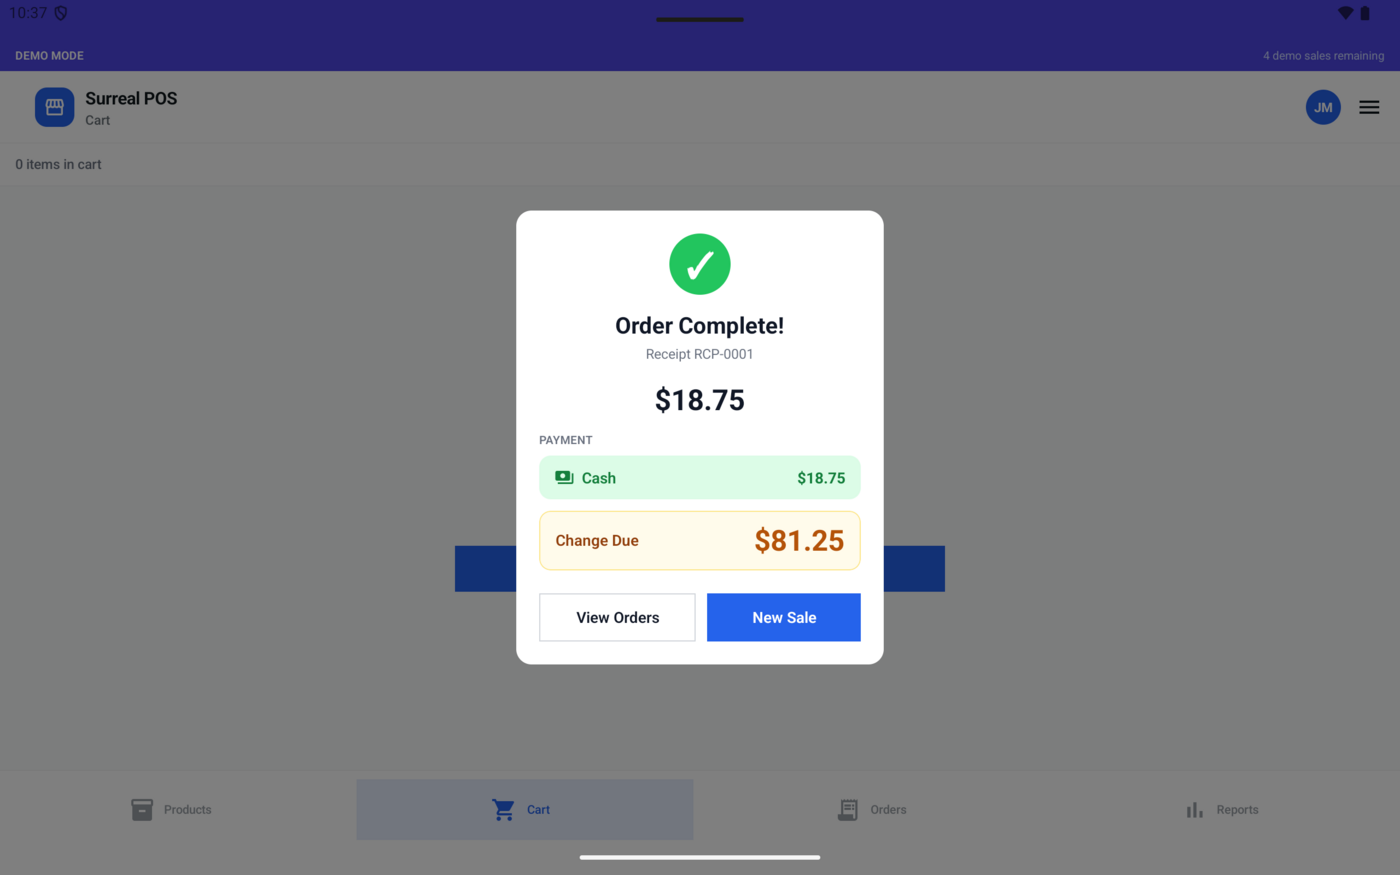
Cash payment and split payment
Cash payments require Amount Tendered. Enter the amount the customer gave you, check Change Due or Amount Short, and complete payment only when the amount is enough.
Use split payment when one order is paid with multiple methods. Turn on Split Payment, enter each payment amount, choose the method for each split, add more methods if needed, and make sure the split total exactly equals the order total.
- Do not double-tap Complete Payment. The app disables processing while a sale is being committed.
- Sales are saved locally first, so checkout can keep working offline.
- Product stock is reduced after checkout.
Review completed sales and manage receipt actions
Use Orders to inspect completed sales, reprint receipts, generate PDFs, print to thermal printers, refund returned items, or void an entire sale.
View orders
- Open the Orders tab.
- Review Today's Orders and Today's Revenue at the top.
- Tap an order card to open Order Details.
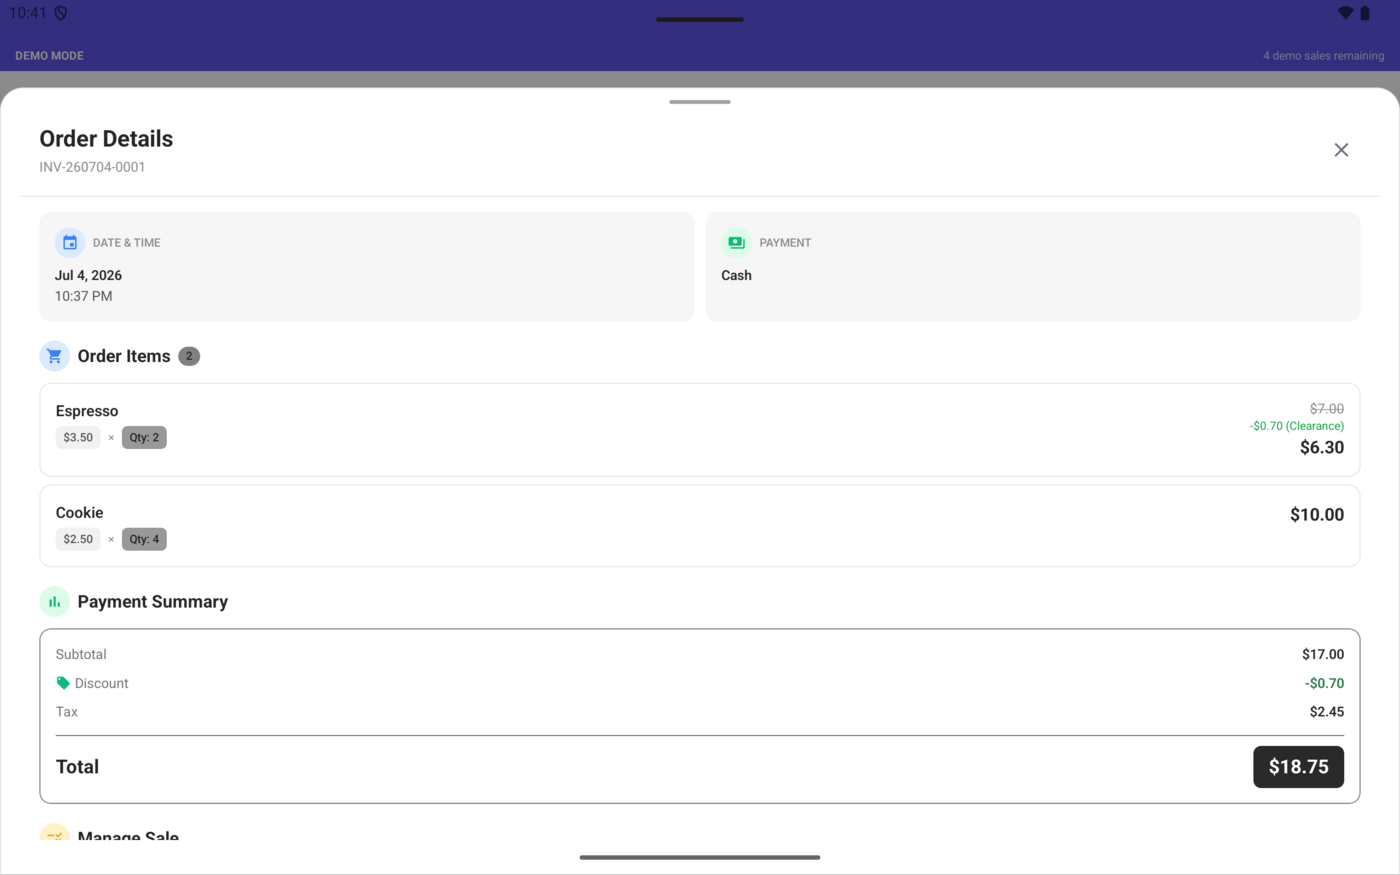
Order details show date and time, payment method, customer if attached, line items, discounts, and totals.
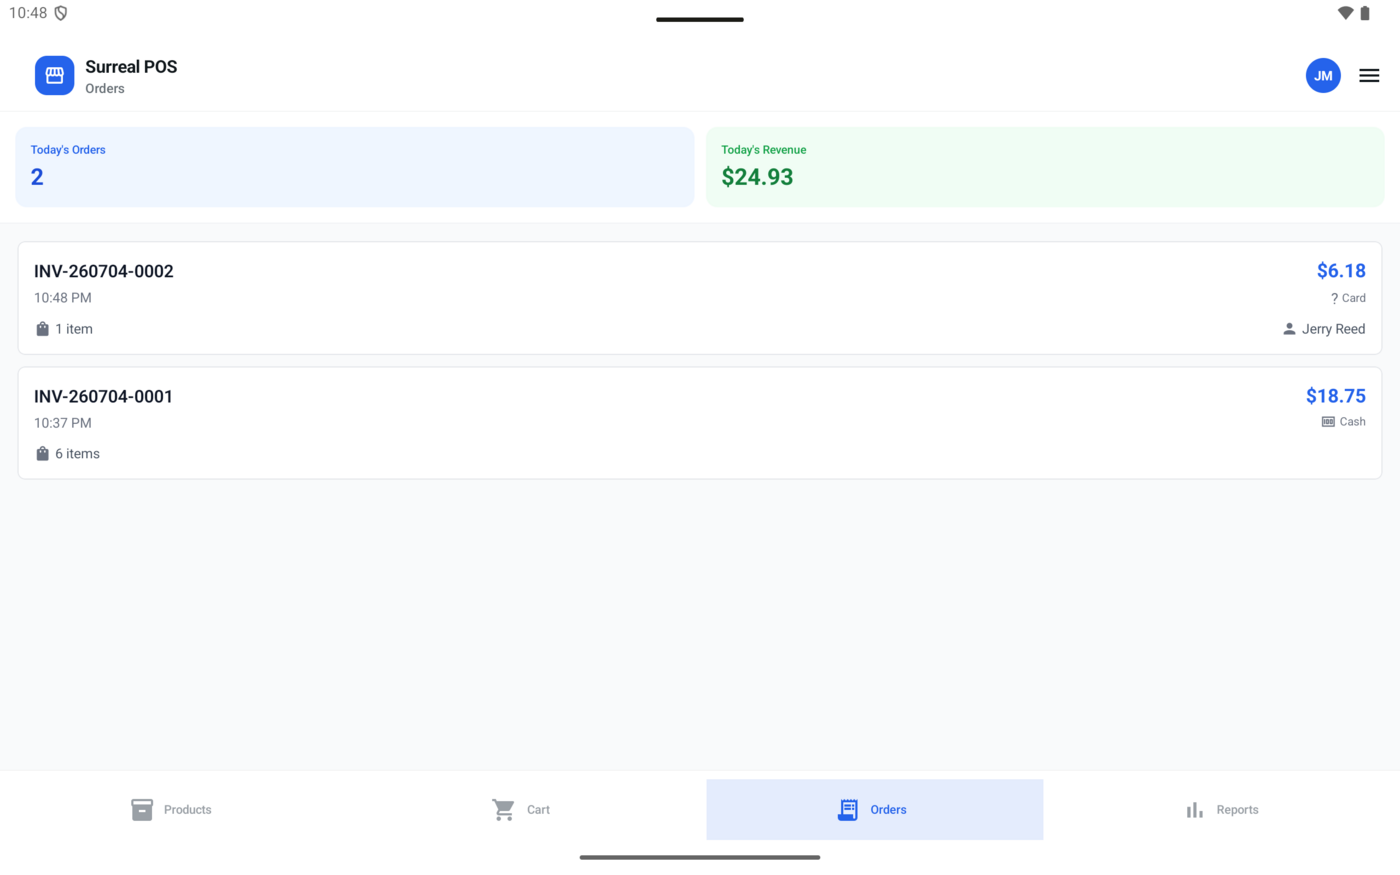
Generate or share a PDF receipt
- Open an order.
- In Receipt Actions, tap Generate PDF.
- After the PDF is available, tap Share or Print.
If the PDF already exists, the button becomes Regenerate PDF.
Print to a thermal printer
- Make sure a printer is configured in Settings.
- Open the order.
- Tap Print to thermal printer.
Bluetooth Classic thermal printing is Android focused in this build.
Refund items
- Open the completed order.
- Under Manage Sale, tap Refund.
- Choose the item quantities to refund.
- Add a reason if useful.
- Review the estimated refund.
- Tap Refund (admin approval).
- Ask an admin or owner to approve the action.
Refunded items are restocked. If an order has already been partially refunded, the modal only allows remaining refundable quantities.
Void a sale
- Open the completed order.
- Under Manage Sale, tap Void.
- Review the warning and selected items.
- Add a reason.
- Tap Void order (admin approval).
- Ask an admin or owner to approve the action.
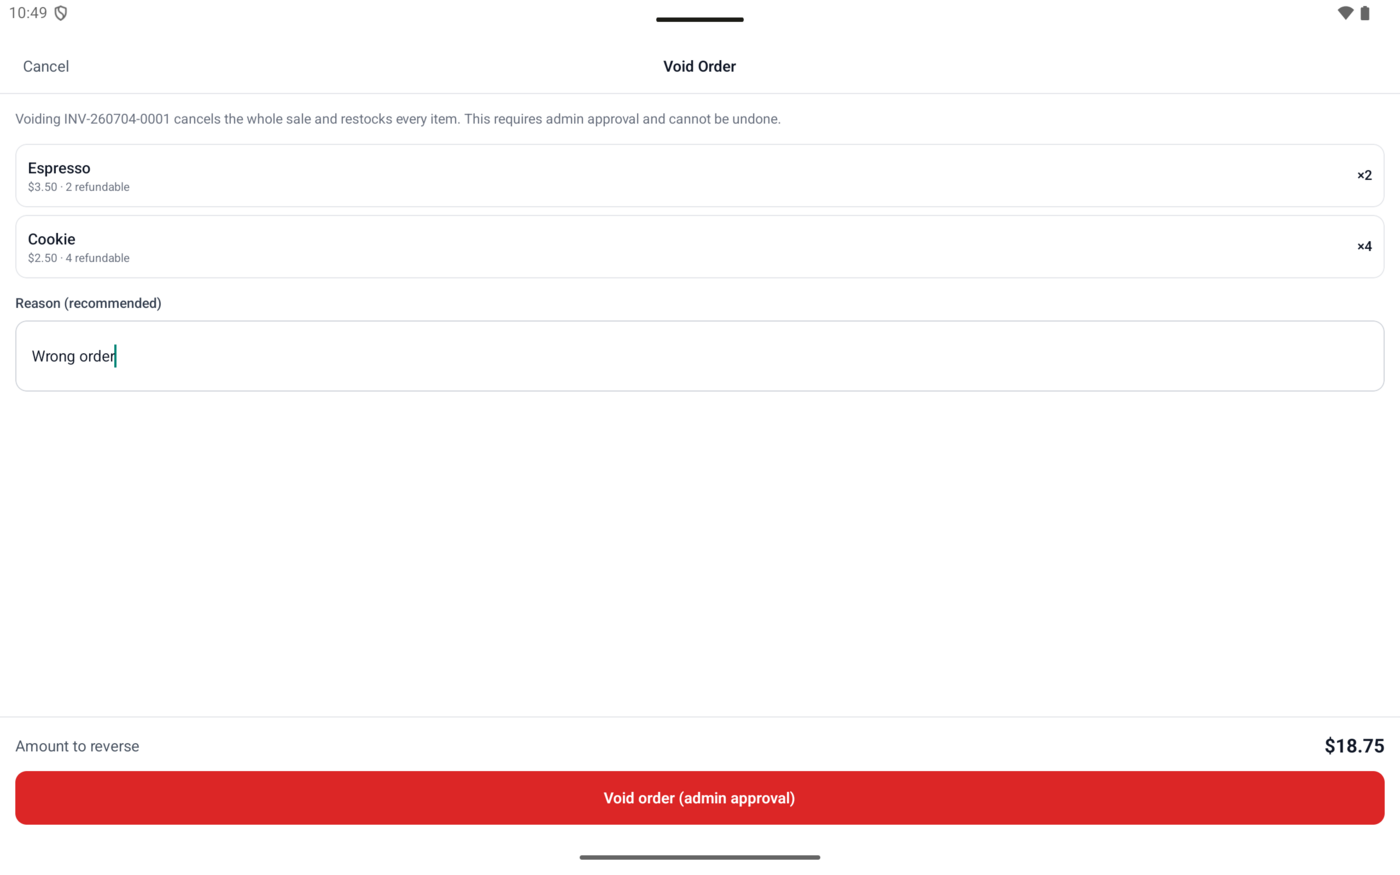
Voiding restocks every item and can only be done when the sale is completed and has not already been refunded.
Manage inventory from product setup to full counts
Use Stock to add products, edit prices, adjust stock, bulk import CSV files, and commit a full stocktake.
Open Stock Management
- Open the drawer menu.
- Tap Stock.
The stock screen shows inventory stats, low stock alerts, and the product list. You can sort by Name, Stock, or Category.
Add a product
- Tap + Add Product.
- Optionally choose a product image.
- Enter Product Name.
- Choose a Category.
- Enter Price and Initial Stock.
- Enter a required SKU.
- Optionally enter or scan a Barcode.
- Choose a Tax Category.
- Optionally enter an HS Code with up to 8 digits.
- Optionally add a description.
- Tap Add Product.
Tax category options are Standard rated, Zero rated, Non-VAT withholding tax, and Exempt. These affect tax calculation and fiscal receipt data.
Edit or delete products
- In Stock, find the product.
- Tap Edit to update product details.
- Tap Update Product to save.
- Tap Delete only when the product should no longer be sold or managed.
Price changes are recorded in the audit log.
Adjust stock
- Tap Adjust Stock on a product.
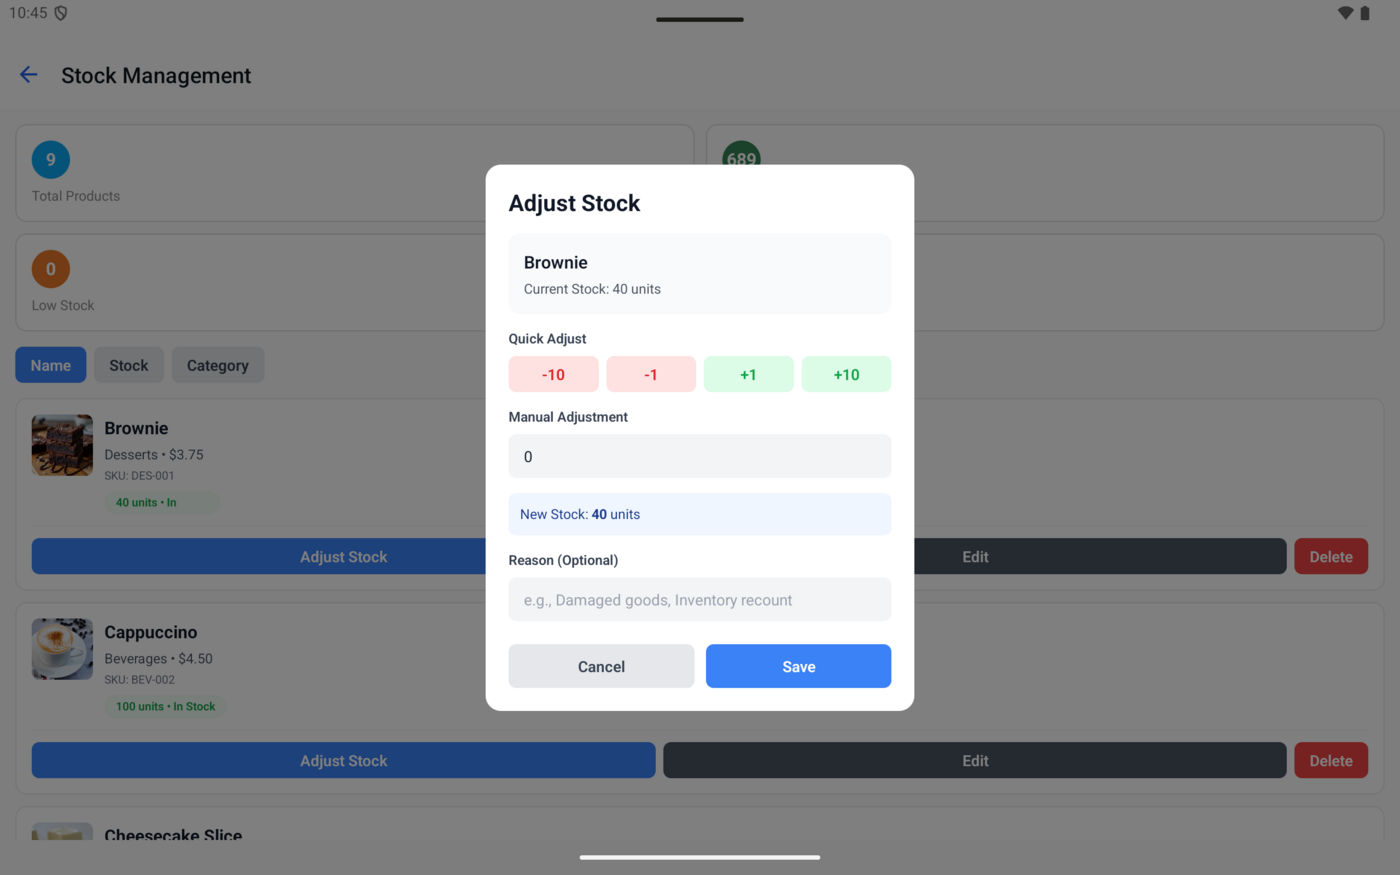
- Use quick buttons such as -10, -1, +1, or +10, or enter a manual adjustment.
- Review New Stock.
- Add a reason if useful.
- Tap Save.
The app will not allow stock to become negative.
Bulk upload products
- Open Stock.
- Tap Bulk Upload.
- Tap Download Template if you need the CSV structure.
- Fill in the CSV.
- Tap Choose CSV File.
- Review the preview.
- Tap Import Products.
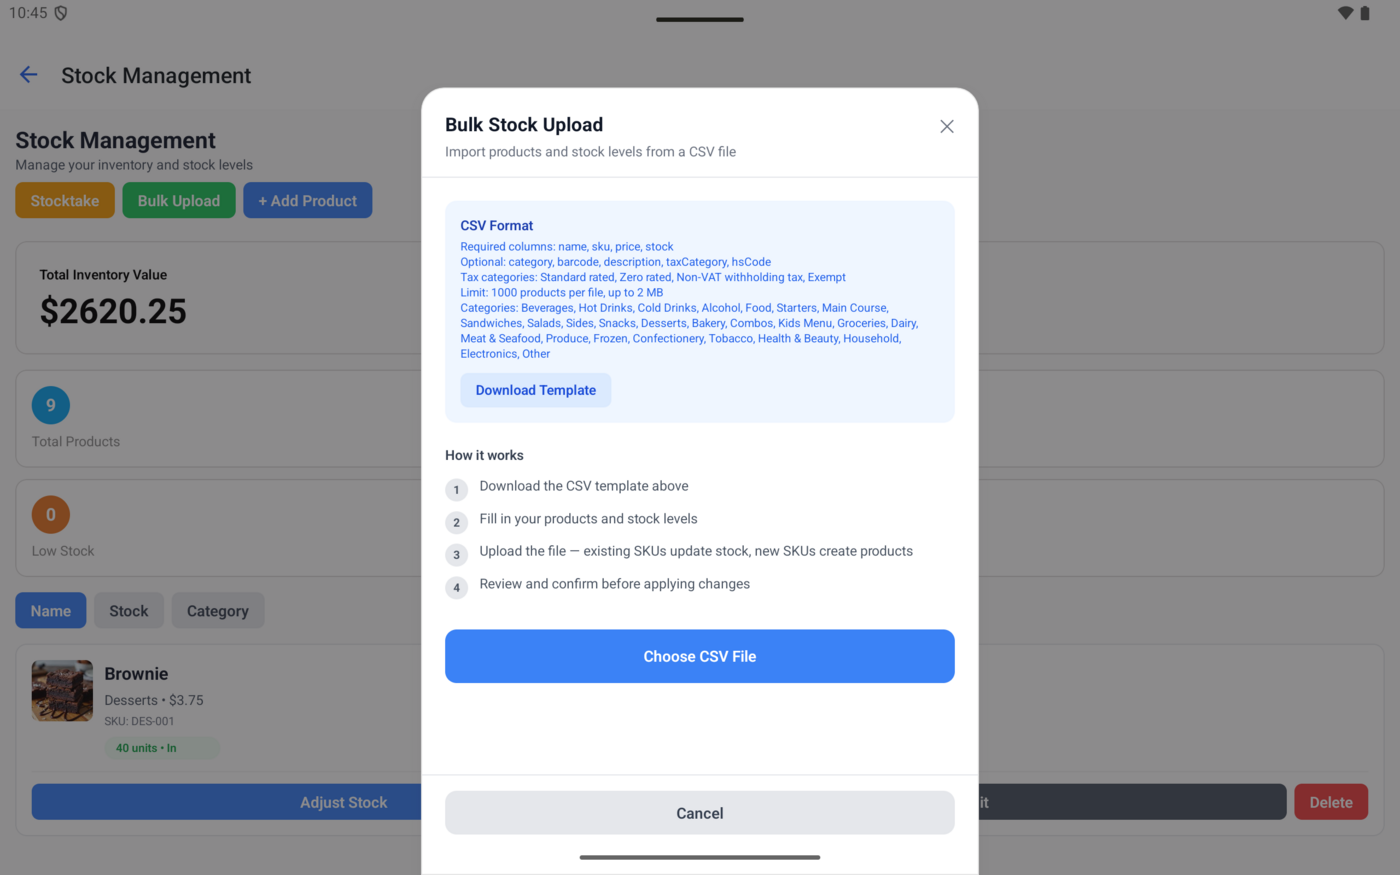
- Required columns are
name,sku,price, andstock. - Optional columns are
category,barcode,description,taxCategory, andhsCode. - CSV files can contain up to 1,000 rows and must be 2 MB or smaller.
- Existing SKUs update products. New SKUs create products.
- Unknown categories are added during import.
Full stocktake
- Open Stock and tap Stocktake.
- Read the warning at the top.
- Tap Scan to count to scan barcodes or SKUs, or search and enter counts manually.
- Review counted products, changes, and net unit movement.
- Tap Commit full count.
- Review the confirmation summary.
- Tap Commit only when the count is final.
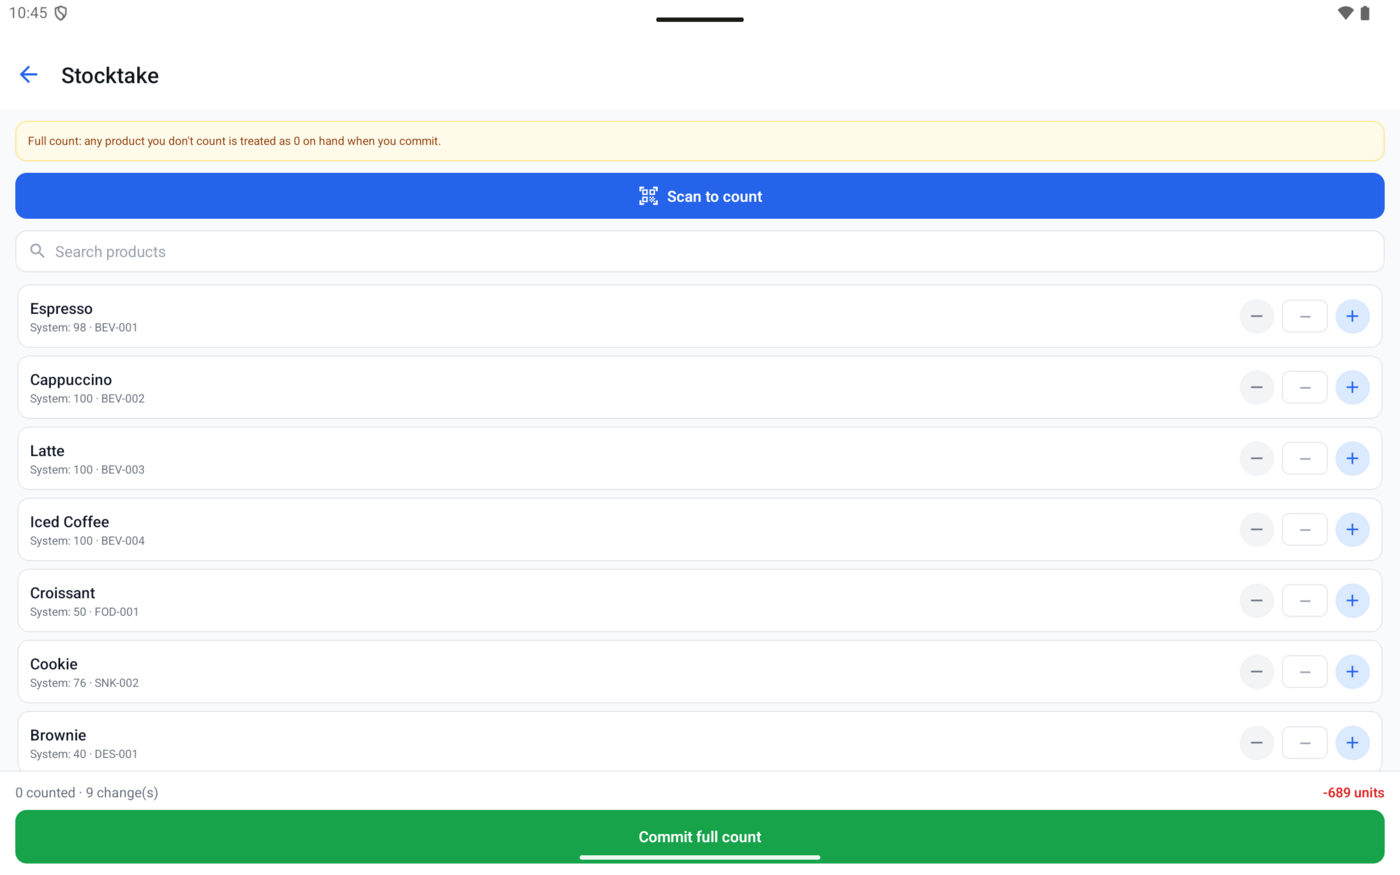
A full stocktake sets every product to its counted quantity. Any product you do not count is treated as 0 on hand when you commit.
Create customer profiles and attach them to sales
Customer records help you search contacts, keep B2B details, and attach customer information to receipts and invoices.
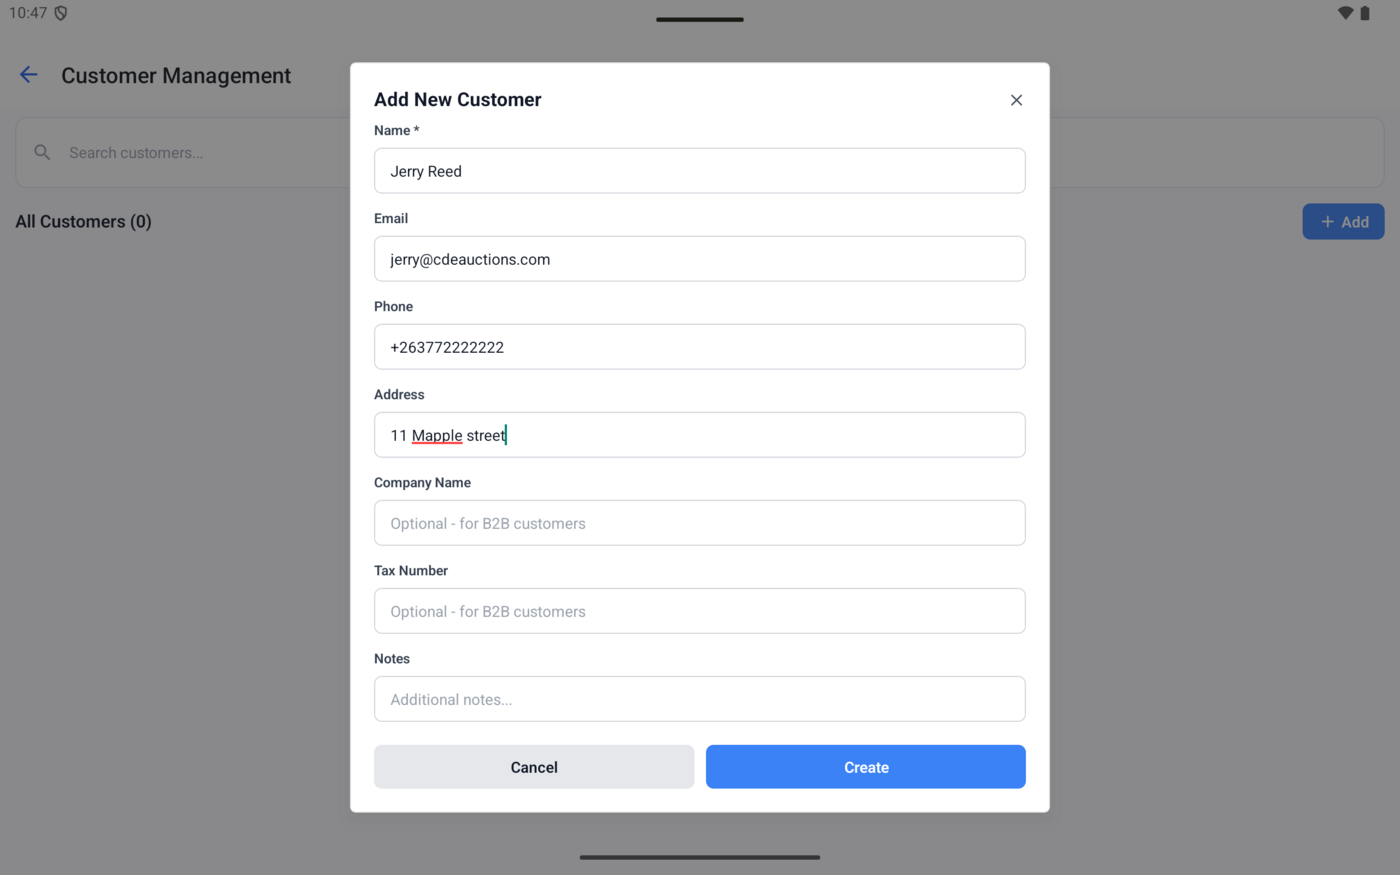
Add or edit a customer
- Open the drawer menu.
- Tap Customers.
- Tap Add.
- Enter Name. This is required.
- Optionally enter email, phone, address, company name, tax number, and notes.
- Tap Create.
To edit, search for the customer, tap the card or Edit, update details, and tap Update.
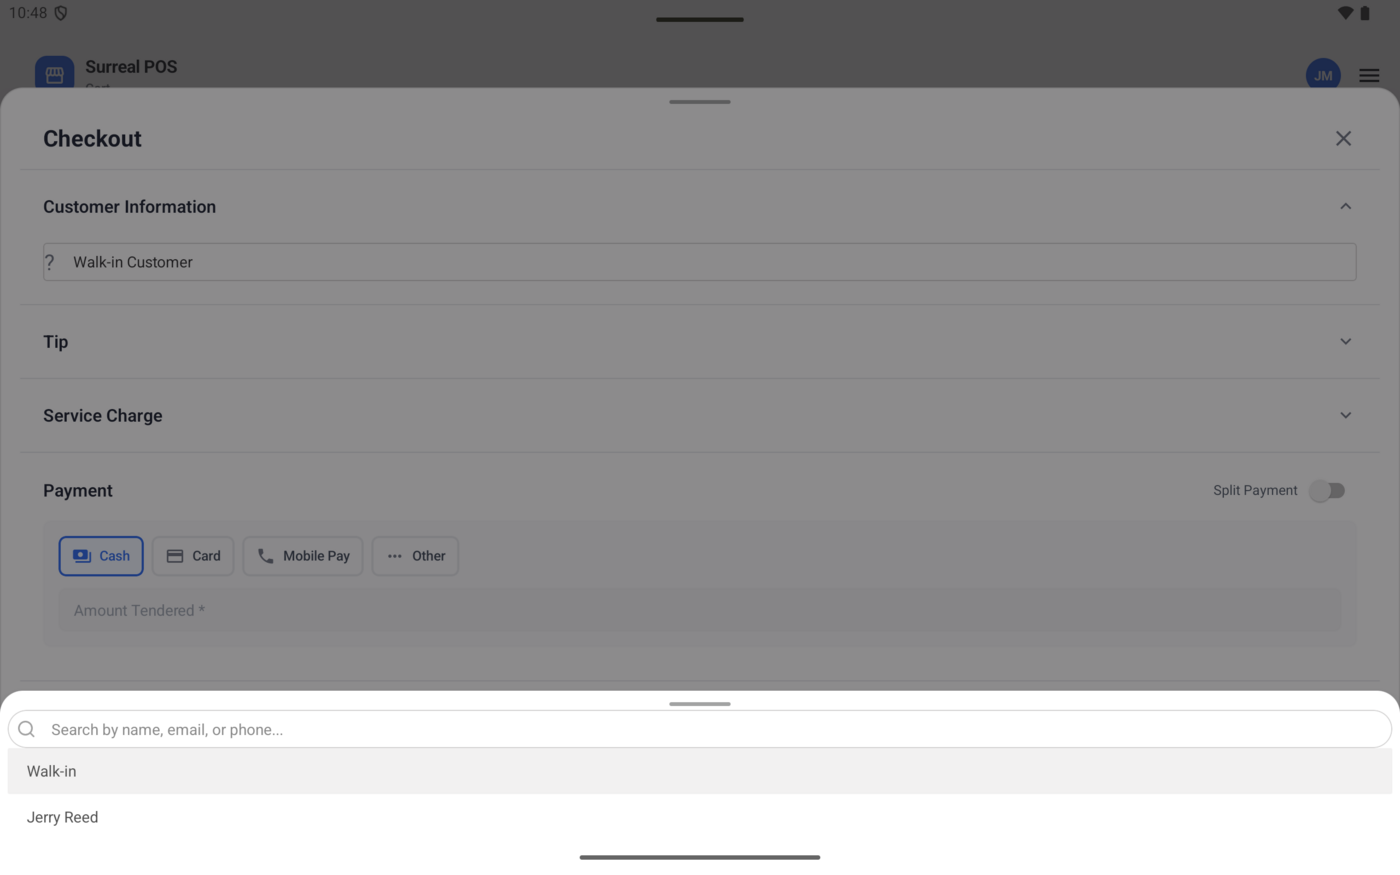
Attach a customer during checkout
- Add items to the cart.
- Open Cart and tap Proceed to Checkout.
- Expand Customer Information.
- Select the customer.
- Complete checkout.
Attached customer details appear in order history and receipt generation.
Delete a customer
- Find the customer.
- Tap Delete.
- Confirm the delete alert.
Deleting a customer removes the profile from the customer list. Past orders keep the customer details saved on the order.
Review performance and export business records
Reports show sales performance, payment method totals, top products, cashier performance, shifts, stock analytics, and export options.
Open and read reports
- Open the Reports tab.
- Choose a period: Today, Week, Month, or All Time.
- Review Revenue, Orders, Avg Order, and Refunds/Voids.
Operational sections
- Payment Methods: cash, card, mobile, and other revenue totals.
- Top Products: highest revenue products, quantity sold, and revenue.
- Sales by Cashier: orders, items sold, and revenue by staff member.
- Today's Shifts: active and completed shifts with sales totals.
Stock analytics
- Total products and total units.
- Total inventory value and average stock per product.
- Stock by category.
- Top products by inventory value.
- Recent stock movements.
Export a report
- Select the report period.
- Tap Export.
- Choose PDF summary + CSV orders, Summary PDF only, or Orders CSV only.
- Share or save the generated files from the system share sheet.
Use the CSV export when you need spreadsheet analysis or accountant handoff.
Configure business identity, tax, receipts, and printing
Settings are usually available to the Shop Owner role and control business details, tax, receipt behavior, receipt appearance, product categories, printers, and theme.
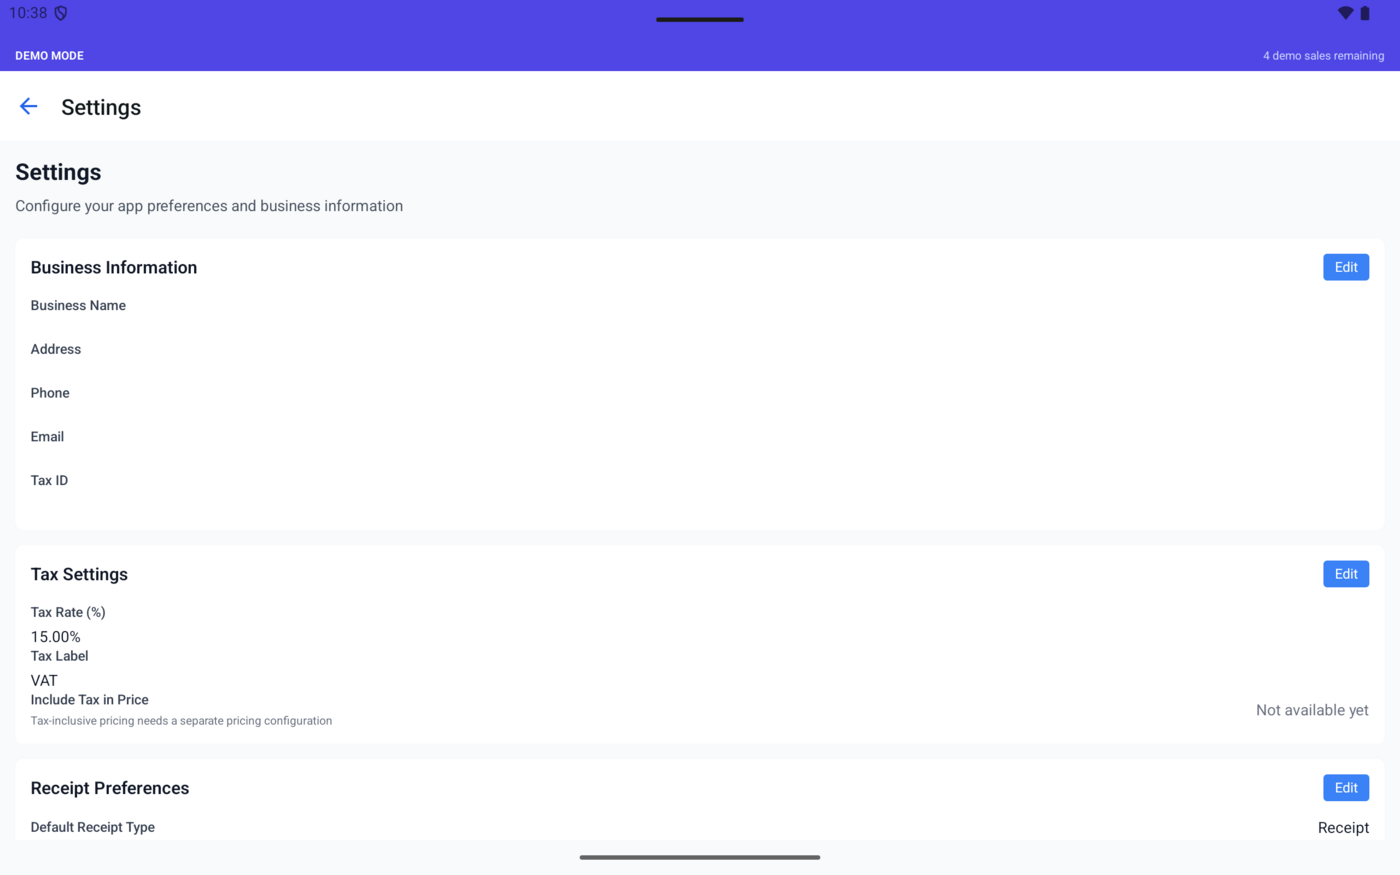
Business information and tax
- Open the drawer menu and tap Settings.
- In Business Information, tap Edit.
- Update business name, address, phone, email, or tax ID.
- In Tax Settings, tap Edit.
- Enter the tax rate as a percentage and a tax label such as VAT, GST, or Sales Tax.
- Tap Save.
Receipt preferences and appearance
- In Receipt Preferences, tap Edit.
- Choose default receipt type: Receipt or Invoice.
- Turn Share Receipt After Checkout or Print After Checkout on or off.
- Enter receipt footer text if needed.
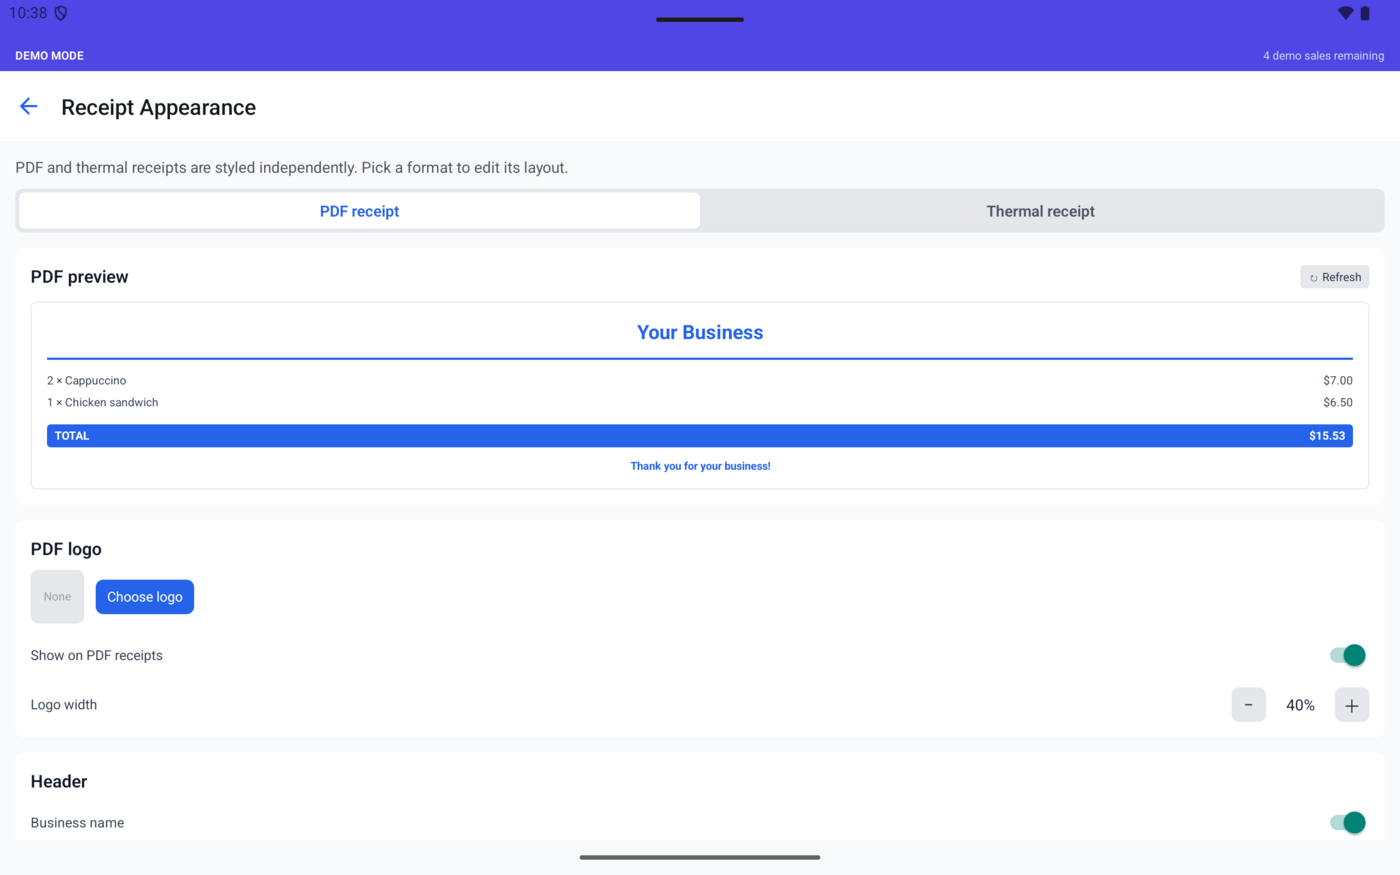
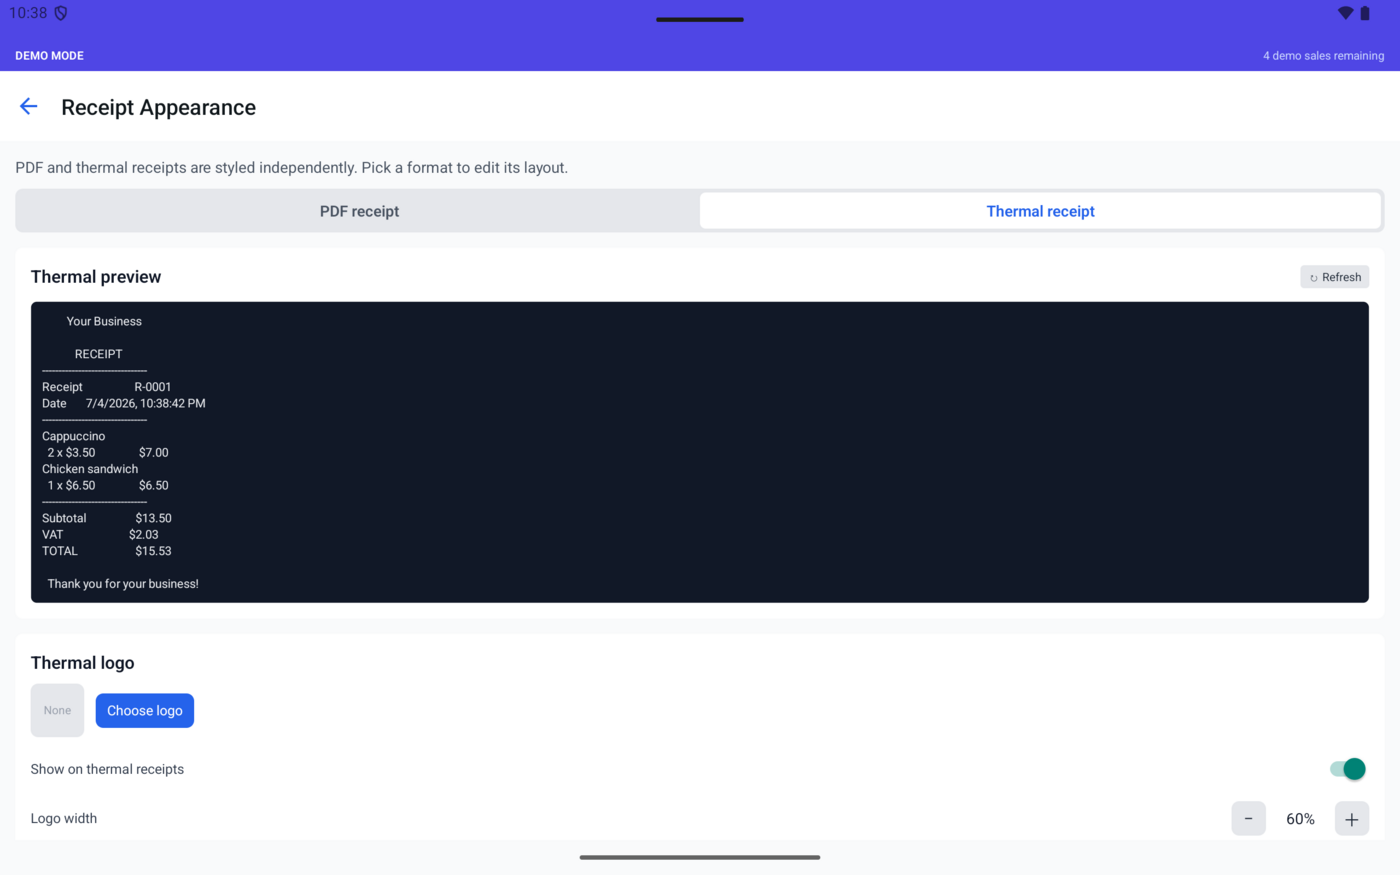
- In Receipt Appearance, tap Customize.
- Choose PDF receipt or Thermal receipt.
- Use the live preview to check the result.
- Configure logo, header fields, footer lines, alignment, PDF accent color, and layout.
PDF and thermal receipt styles are configured independently.
Receipt printer
- Turn Receipt printer on.
- Pair the printer in the device Bluetooth settings first.
- Return to Surreal POS and tap Scan.
- Select the paired printer.
- Choose paper width: 58mm or 80mm.
- Turn Open cash drawer on if the printer controls a cash drawer.
- Tap Print test receipt.
- Bluetooth Classic thermal printing is supported on Android in this build.
- iOS needs an MFi-certified printer integration.
- Printer scanning may require a native app build with the Bluetooth module.
Product categories and theme
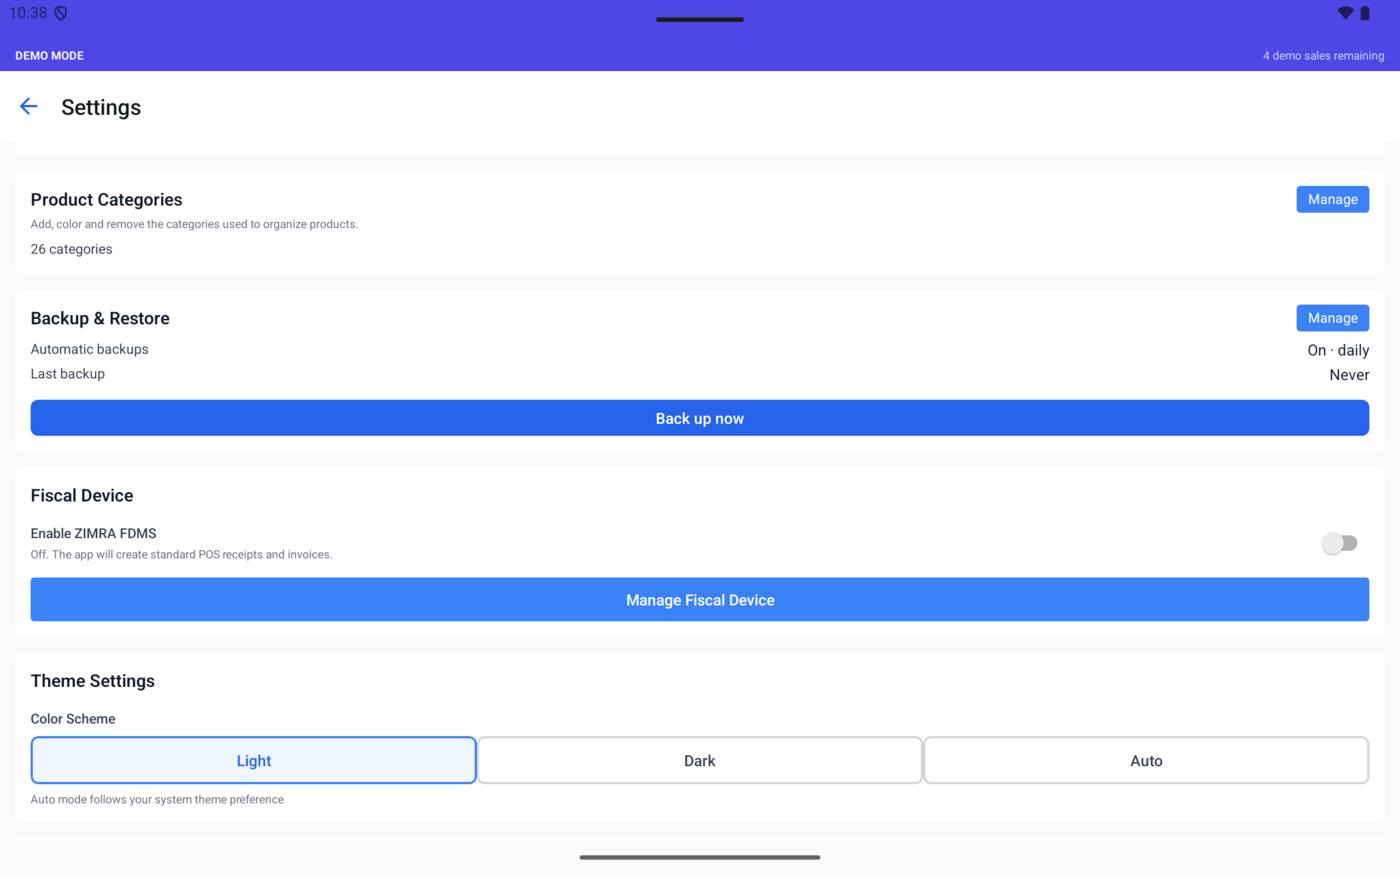
In Product Categories, tap Manage, add a category name, choose a color, and save. Theme settings can be Light, Dark, or Auto. Auto follows the device system theme.
Manage team access, PINs, shift history, and audit entries
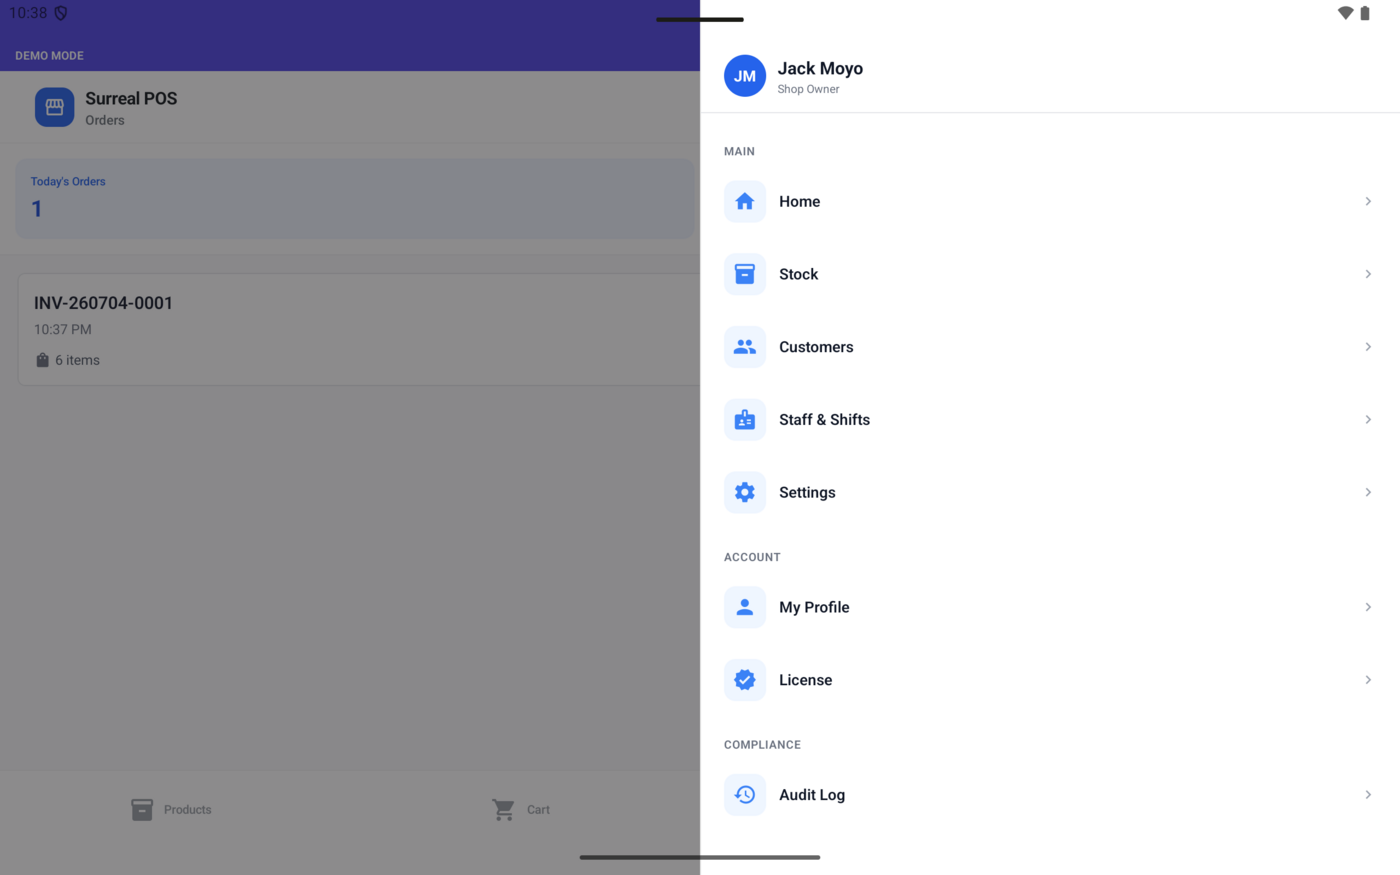
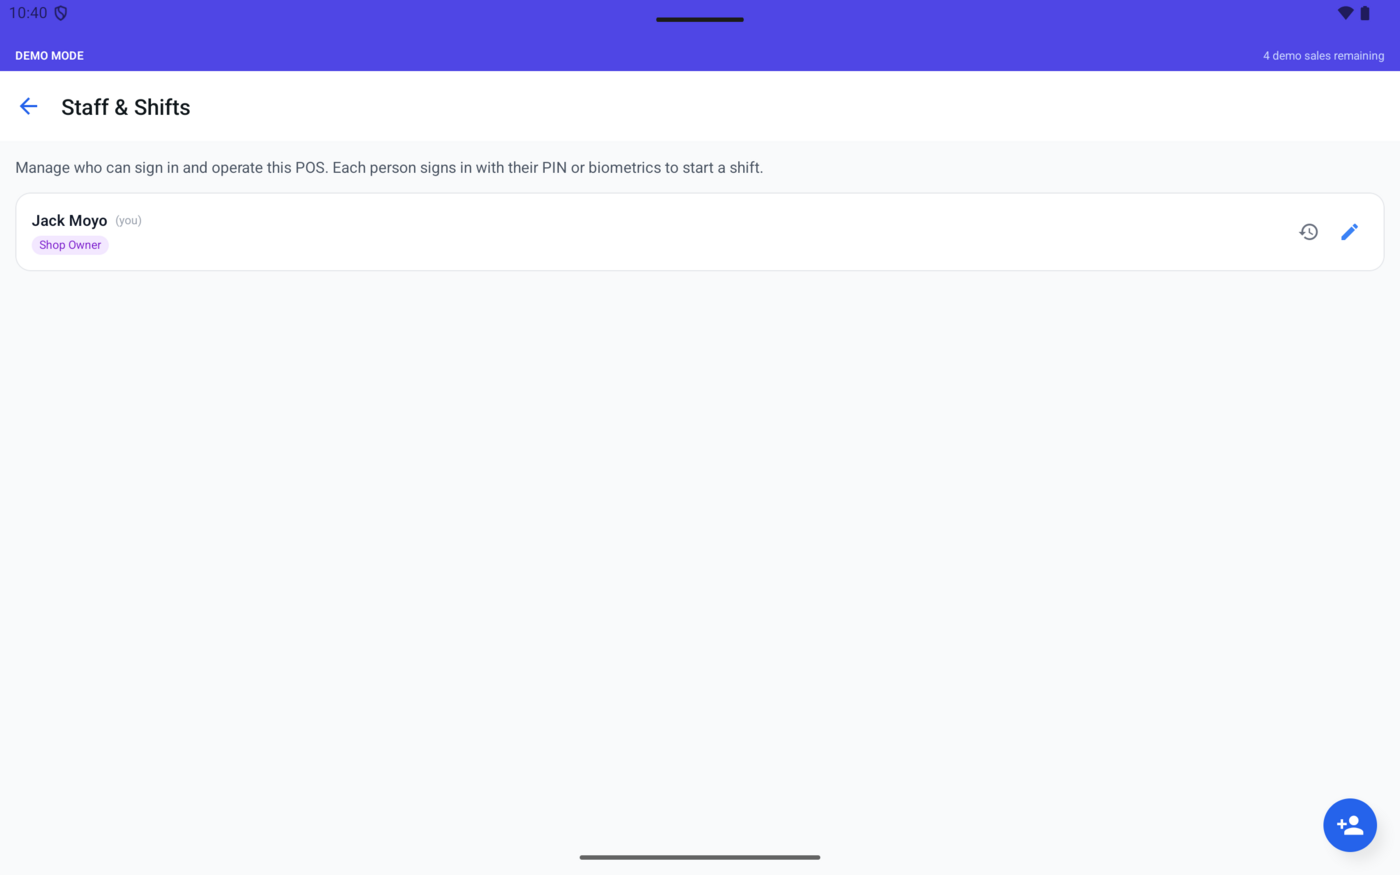
Staff & Shifts controls who can sign in and what they can do. Audit Log records sensitive actions for accountability.
Roles and permissions
| Role | Can do |
|---|---|
| Cashier | Sell on POS and view orders. |
| Admin | Cashier permissions plus products, stock, customers, reports, audit log, and cashier account management. |
| Shop Owner | Admin permissions plus settings, FDMS, licensing, and managing all users. |
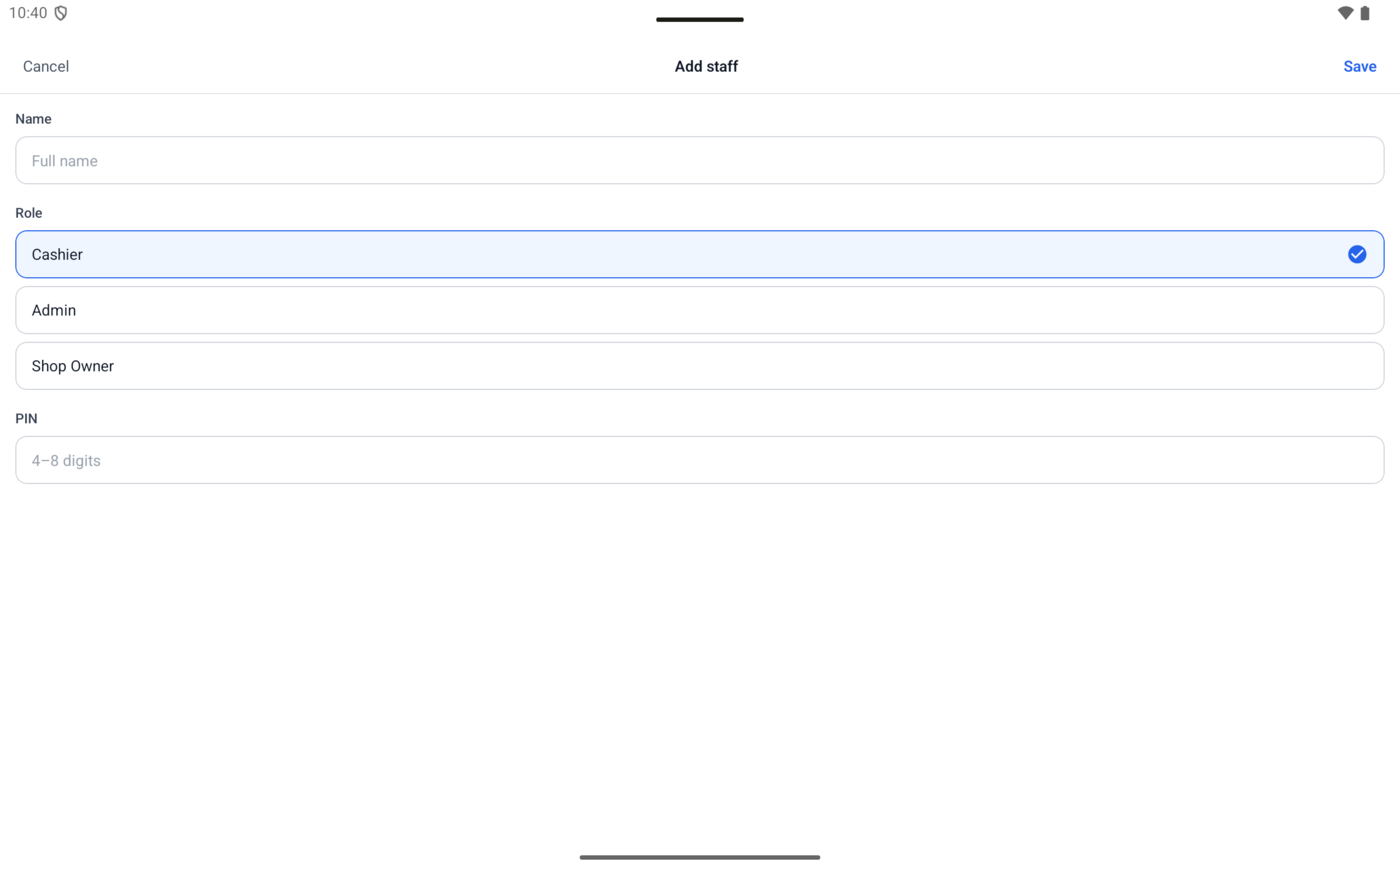
Add staff
- Open the drawer menu.
- Tap Staff & Shifts.
- Tap the add staff button.
- Enter the staff member's name.
- Choose a role you are allowed to assign.
- Enter a numeric PIN with 4 to 8 digits.
- Tap Save.
Edit staff or reset a PIN
- Open Staff & Shifts.
- Tap the edit button on a staff card.
- Update name or role if needed.
- Enter a new PIN in Reset PIN when needed.
- Leave Reset PIN blank to keep the current PIN.
- Tap Save.
Deactivate staff and review shift history
To deactivate a staff member, tap the deactivate button on their staff card and confirm the alert. You cannot deactivate your own account while signed in, past sales remain linked to deactivated staff, and at least one active Shop Owner must remain.
To review shift history, tap the history button on a staff card. The history shows total sales, orders, shifts, and daily session details.
Use the audit log
- Open the drawer menu.
- Tap Audit Log.
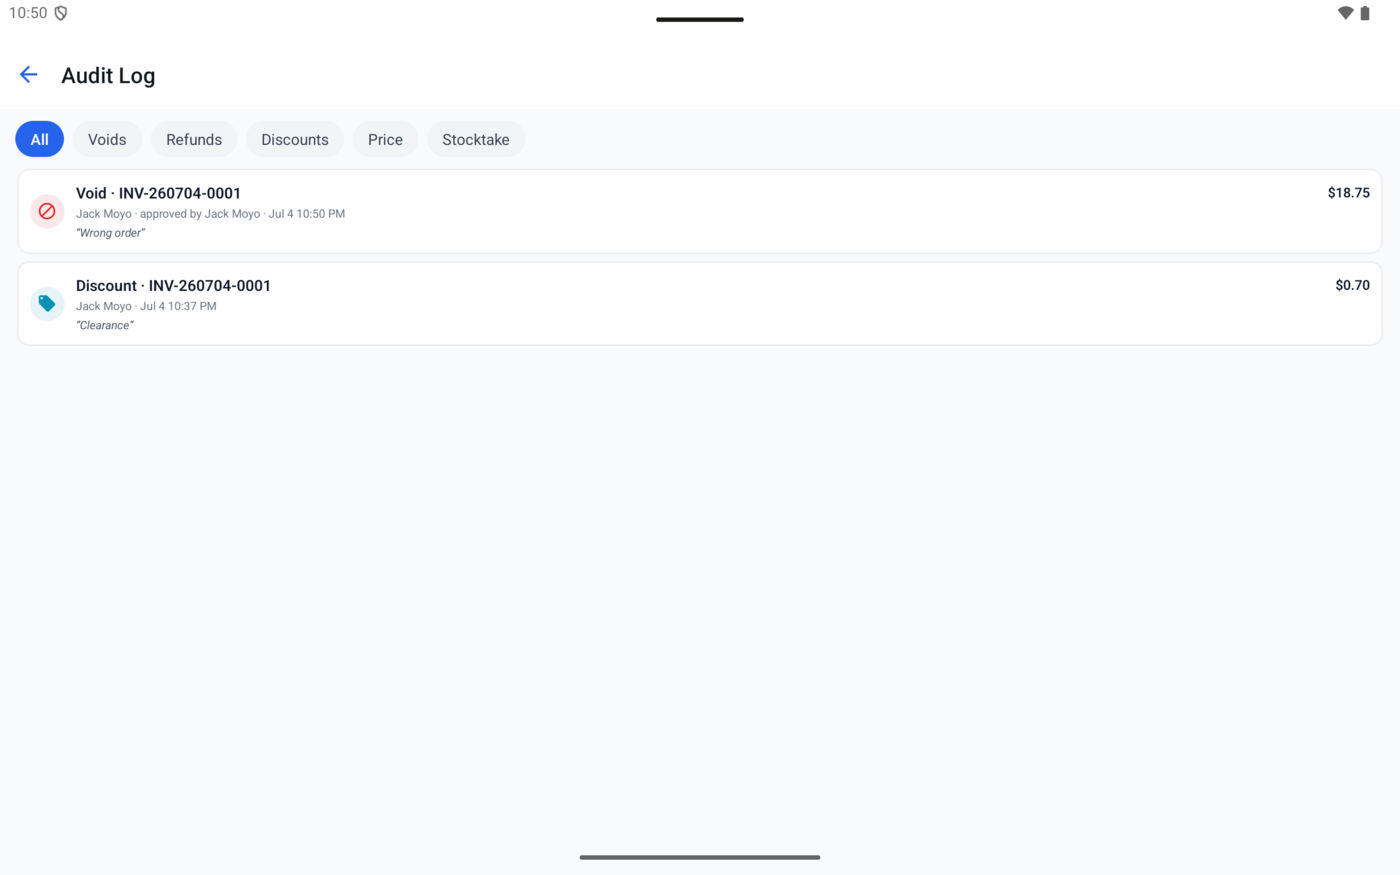
- Filter by All, Voids, Refunds, Discounts, Price, or Stocktake.
Audit entries show the action, related product or order, amount when relevant, actor, approving user when relevant, time, and reason.
Protect local data and recover from backup files
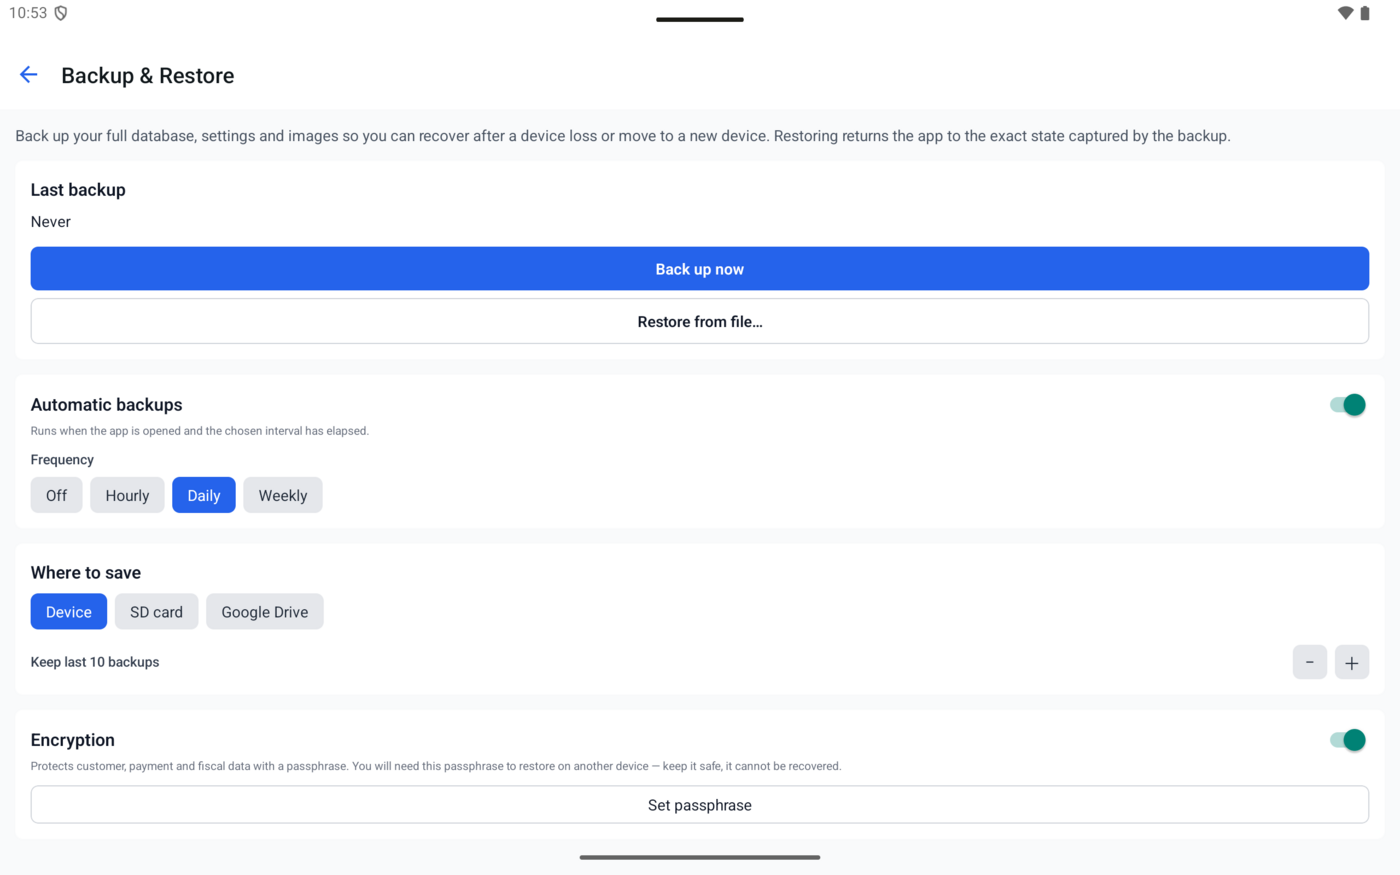
Backups contain the local database, settings, and images. Restoring a backup replaces all current local data on the device.
Back up now
- Open Settings.
- Find Backup & Restore.
- Tap Back up now.
You can also open the full Backup & Restore screen, then tap Back up now from there.
Configure automatic backups
- Open Backup & Restore.
- Turn Automatic backups on.
- Choose Hourly, Daily, or Weekly.
Automatic backups run when the app is opened and the chosen interval has elapsed.
Choose where backups are saved
- Device: save backups locally.
- SD card: Android only; choose an accessible folder.
- Google Drive: requires Google Drive setup and sign-in.
Enable backup encryption
- Open Backup & Restore.
- Turn Encryption on.
- Set a passphrase with at least 6 characters.
- Store the passphrase somewhere safe.
If a backup passphrase is lost, the encrypted backup cannot be restored.
Restore from a file
- Open Backup & Restore.
- Tap Restore from file....
- Choose a backup file.
- If the file is encrypted, enter its passphrase.
- Read the warning carefully.
- Confirm Restore.
- Close and reopen the app when prompted.
Backups saved on the device can also be shared, restored, or deleted from the Backups on this device list.
Start a trial, try demo mode, or activate a license
Licensing controls trial access, demo mode, license activation, status refresh, and license deactivation on the device.
Choose a license option
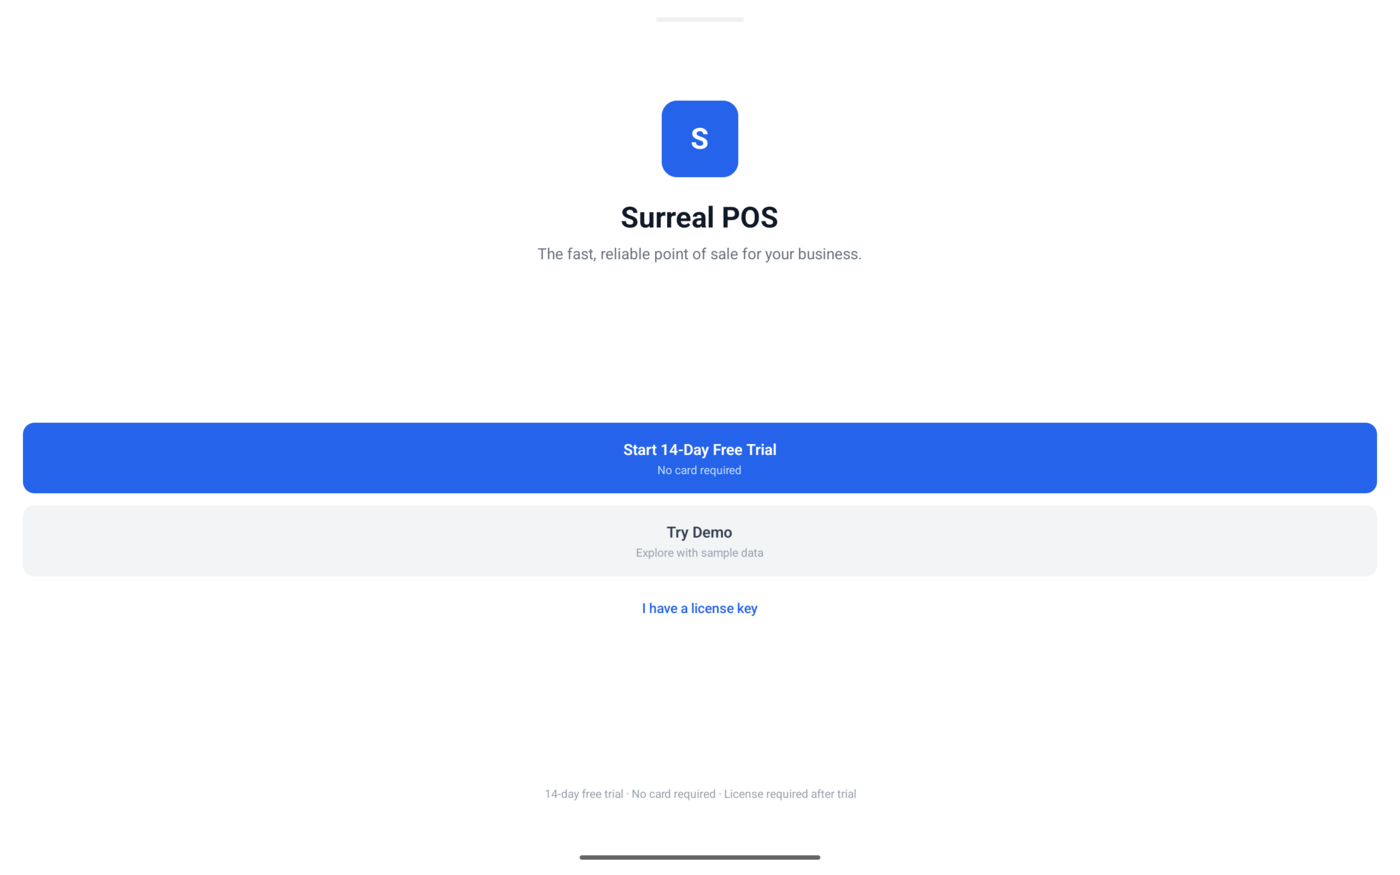
When no active license is found, the app offers Start 14-Day Free Trial, Try Demo, and I have a license key.
Start a free trial
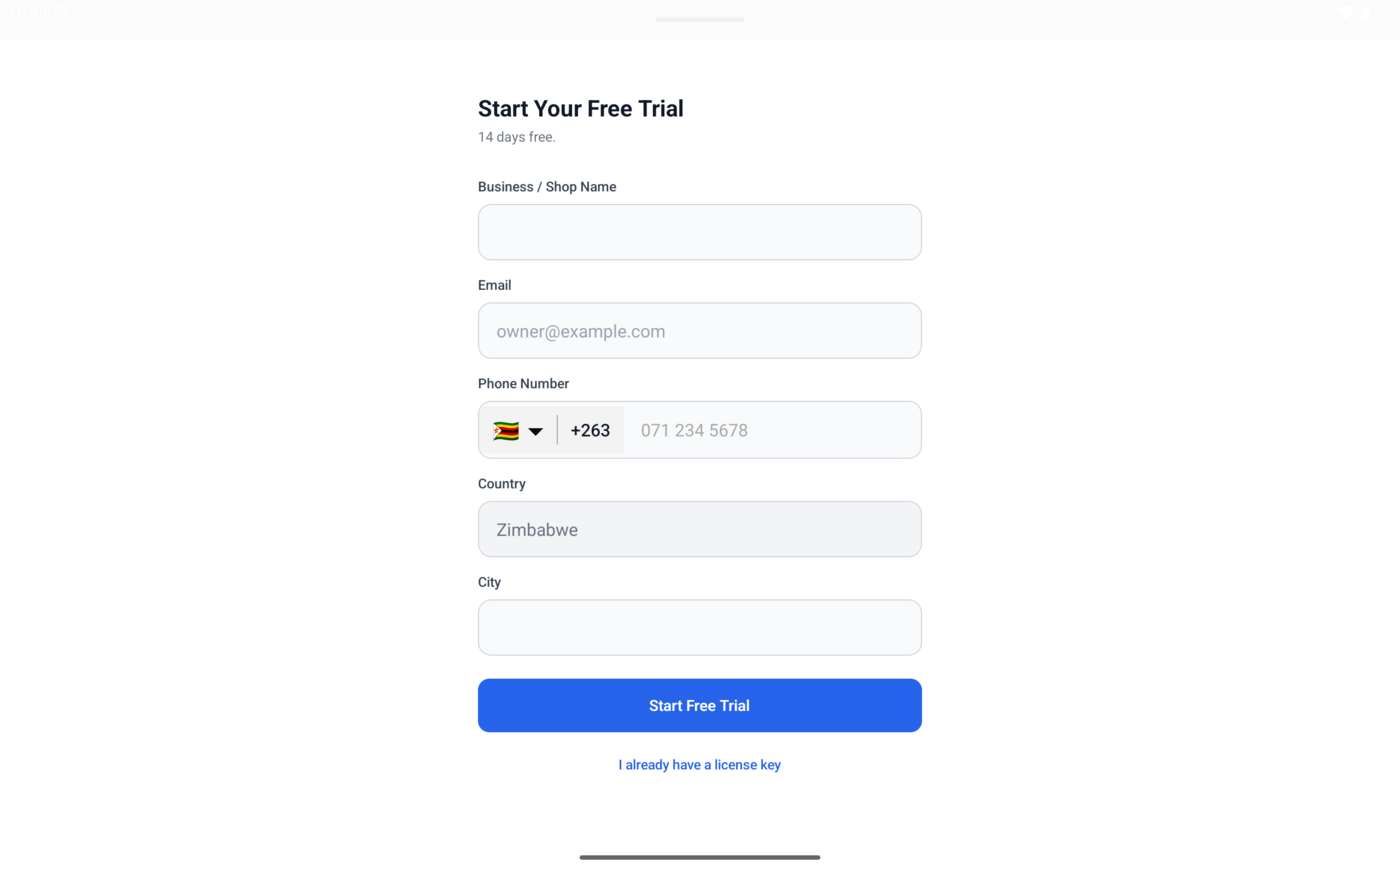
- Tap Start 14-Day Free Trial.
- Enter business or shop name.
- Enter email.
- Enter phone number.
- Confirm country from the phone picker.
- Enter city.
- Tap Start Free Trial.
Try demo mode
- Tap Try Demo.
- Explore the app with demo data.
- Open License to see how many demo sales remain.
- Open the drawer and tap Exit demo mode to leave demo mode.
Activate and manage a license
- Tap I have a license key, or open License and tap Activate License.
- Enter the license key, for example
SRPOS-XXXX-XXXX-XXXX. - Tap Activate License.
The License screen shows business name, email, status, plan, license key, activation date, and expiry date. Use Refresh License to re-check status, or Deactivate License when removing the license from this device.
If activation fails, check the key and contact assist@sourcegambit.com.
Enable ZIMRA FDMS and register fiscal devices
FDMS tools help shops enable fiscal receipts, register a device, review saved configuration, and understand fiscal day status.
Enable FDMS
- Open Settings.
- Find Fiscal Device.
- Turn on Enable ZIMRA FDMS.
- Tap Manage Fiscal Device.
When FDMS is off, the app creates standard POS receipts and invoices. When FDMS is fully configured and runtime-ready, completed sales are fiscalized and include a ZIMRA QR code.
FDMS main screen
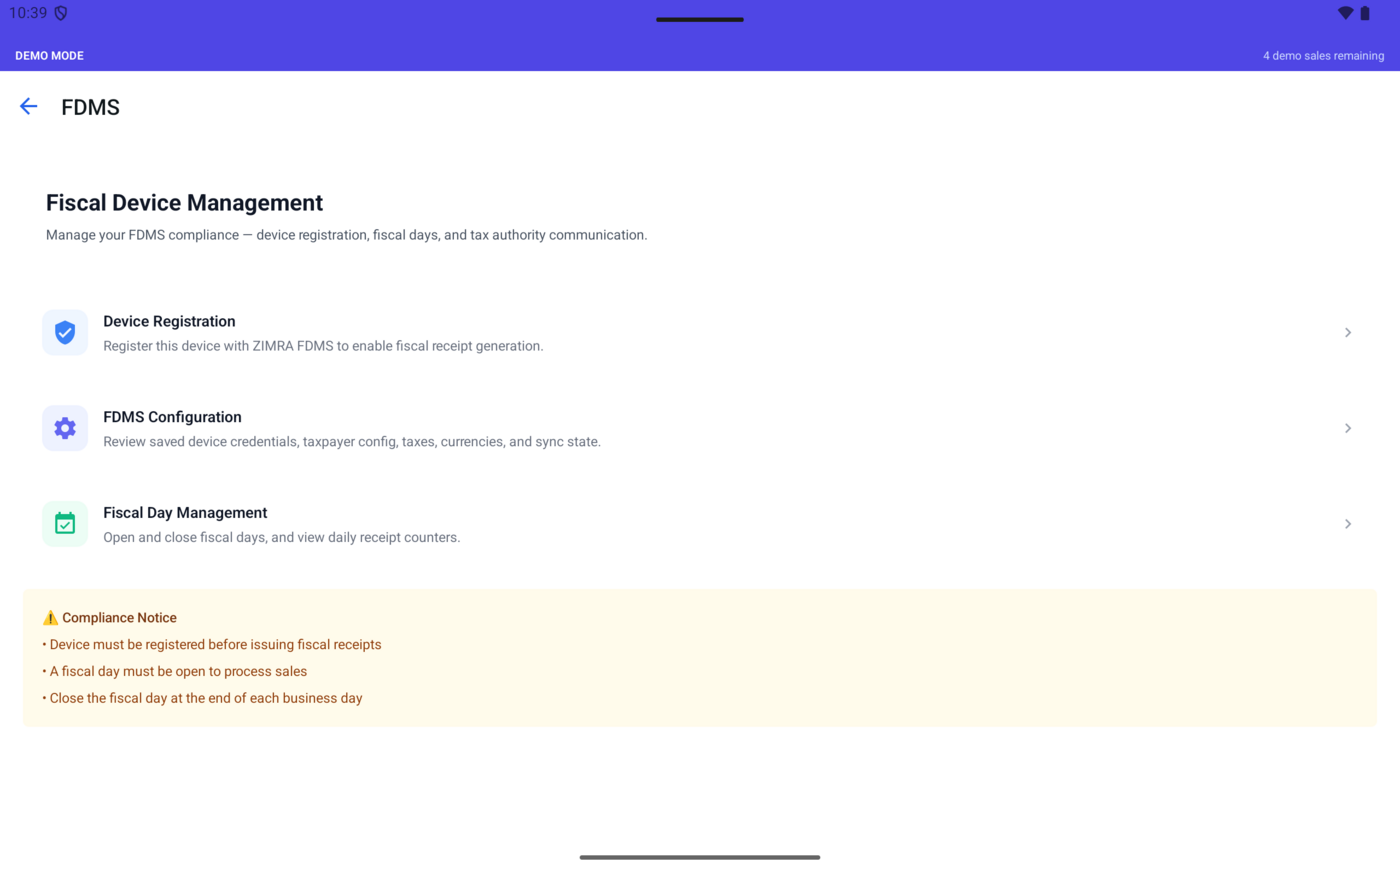
- Device Registration: register this device with ZIMRA FDMS.
- FDMS Configuration: review credentials, taxpayer config, taxes, currencies, and sync status.
- Fiscal Day Management: open and close fiscal days and review receipt counters when runtime support is available.
Register a fiscal device
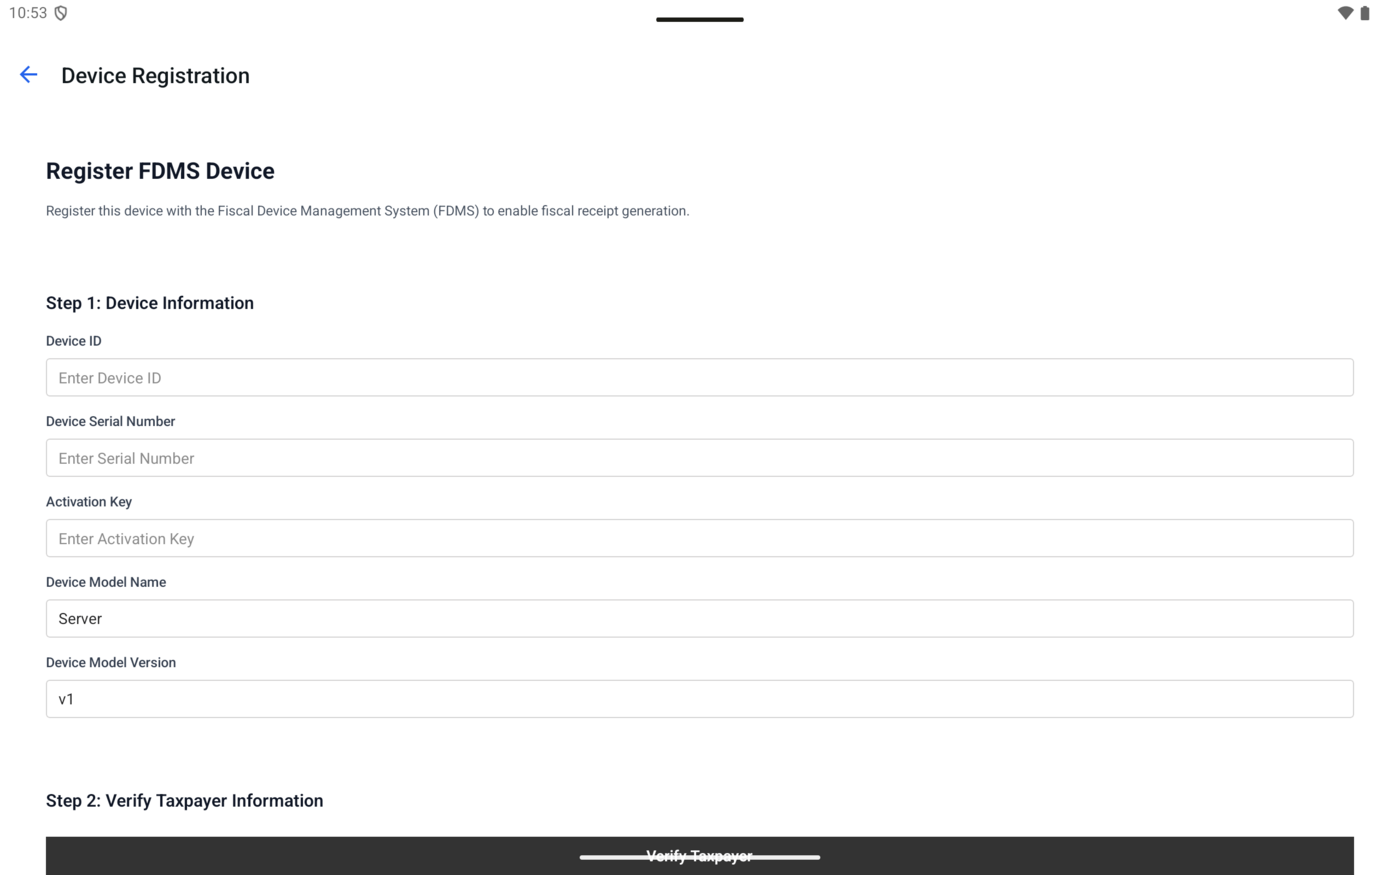
- Open FDMS.
- Tap Device Registration.
- Enter Device ID.
- Enter Device Serial Number.
- Enter Activation Key.
- Confirm Device Model Name and Device Model Version.
- Tap Verify Taxpayer.
- Review taxpayer name, TIN, VAT number if present, and branch.
- Tap Register Device only after verifying the taxpayer details.
Registration generates and stores security credentials on this device, then attempts to sync FDMS configuration.
Review FDMS configuration
Open FDMS Configuration to review whether FDMS is enabled, environment, auto sync, last sync time, device ID, serial number, model, certificate, private key, certificate expiry, taxpayer data, taxes, currencies, and defaults.
Fiscal day management
When fiscal day runtime support is available, a fiscal day must be open before fiscal receipts can be issued and should be closed at the end of the business day. If runtime support is unavailable, normal POS checkout remains available while FDMS is turned off in Settings.
- Register the device only with correct taxpayer and branch details.
- Keep activation keys and fiscal credentials private.
- Do not delete or overwrite fiscal credentials unless you understand the FDMS process.
- Confirm configuration sync before issuing fiscal receipts.
Actions that affect business records
A few Surreal POS actions have immediate operational effects. Review these before training staff.
- A completed sale affects stock and order records immediately on this device.
- A refund or void restocks returned items and requires admin approval.
- A full stocktake treats any uncounted product as 0 on hand when committed.
- Restoring a backup replaces all current local data on the device.
- FDMS registration stores fiscal credentials on this device. Confirm taxpayer details before registering.
- Deactivated staff remain linked to their historical sales and shifts.
- Deleted customers are removed from the customer list, but past orders keep their saved customer details.
Send a support request with your device model, operating system version, and a short description of the workflow you are trying to complete.